
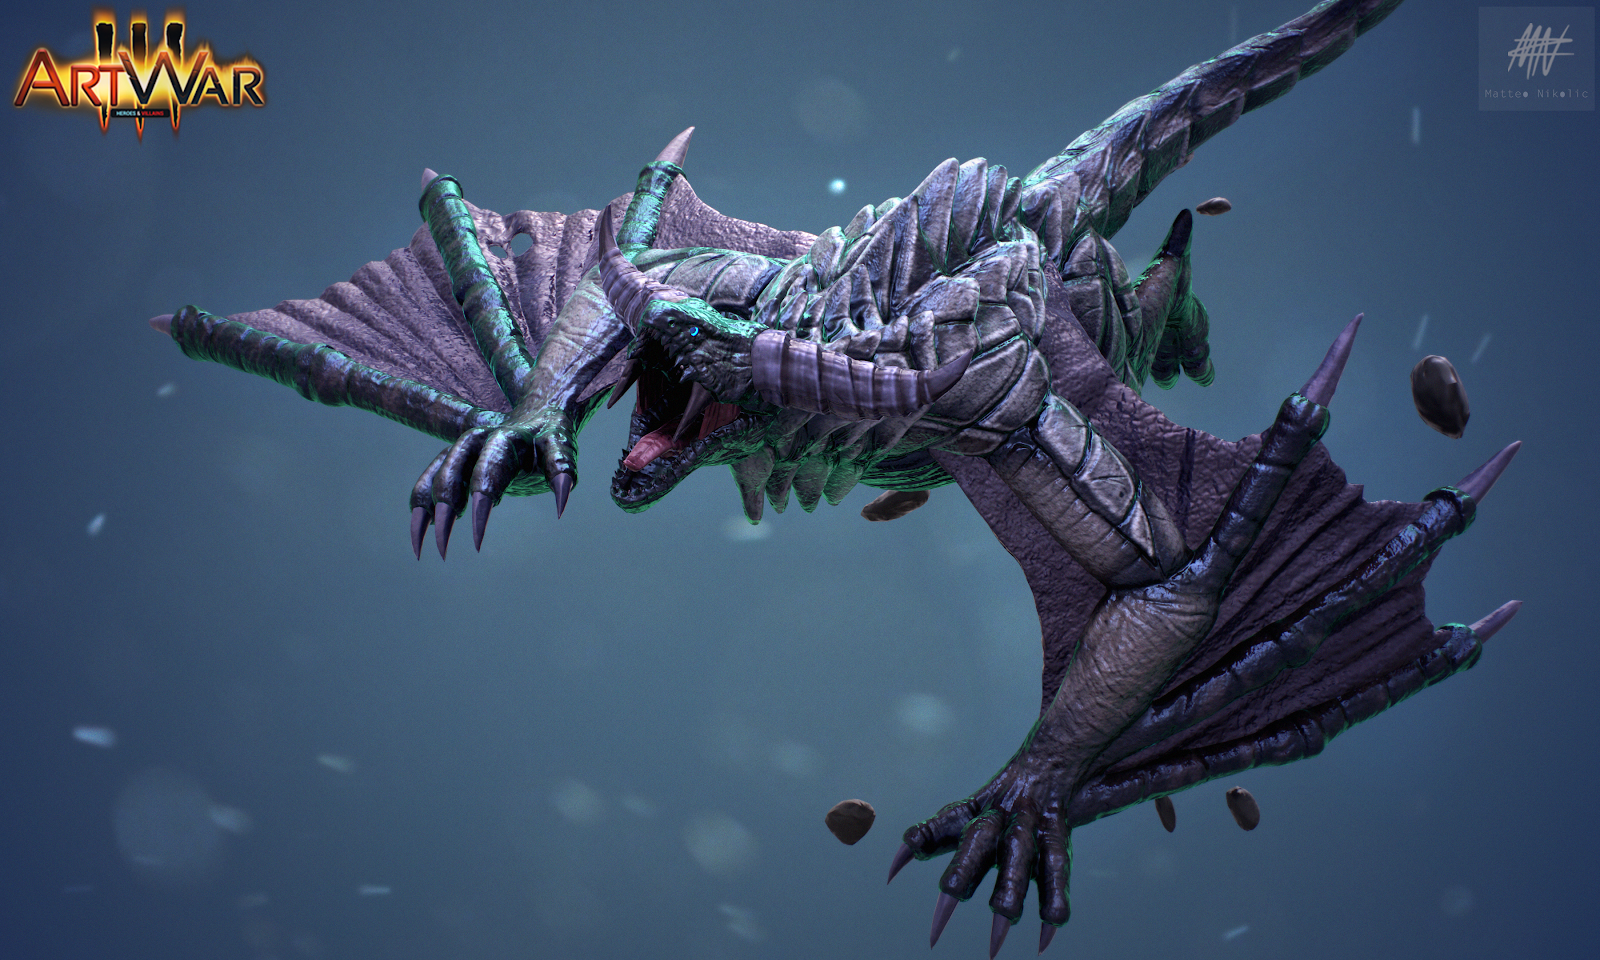
A 3D Digital Art Tutorial- RAKNADON
My name is Matteo Nikolic and I am a self taught 3D Character and Creature Artist. I am especially fascinated with dragons, I guess if you look at my entry you can tell. After graduation I had no clue what to do because the school system really blurred my personality. First, I tried studying Business Informatics, then Mathematics and eventually ended up studying Japanese Studies for three terms.
Somehow, Japanese was a small step in the right direction if you consider the fascinating art in Anime/Manga and the beauty of Japanese video games (like Final Fantasy). Nevertheless, it didn't feel right to me and I somehow started drawing again. I remembered how much fun it was and that it was definitely the right path for me. Which is why I took a digital illustration course with the determination of becoming a 2D Concept Artist. One day I tried ZBrush and immediately fell in love with it - haven't stopped sculpting since.
Making of RAKNADON
Brainstorming
Generally, I will never start sculpting without having a rough idea. In most cases I try to think about the final emotion or even pose which I want to portray. Modeling to me is really just like painting, you kind of need to know what you want to paint. Even though you don't know the subject yet, you may already have set your mind about the colors. So, after brainstorming for two to three days while looking at pictures, I recommend creating a mood board!
For those who actually like to scribble around, there is a cool tool for exploring shapes: Alchemy
Reference
Next step will be to look for reference. For example, If I decided that I want to do some kind of insect-like creature, I will look up high res pictures of insects. Once I have gathered enough pictures I will be using Kuadro to fill up my second screen with all the references – it´s an awesome tool and it´s free!
Starting with a Sphere
In Zbrush I will start with a simple sphere. I will activate symmetry and use the Move-brush and start playing around while keeping my mesh resolution super low. I also like to use the ClayBuildup and DamStandard.
My initial sphere will most likely end up becoming the head, but I will have duplicated that sphere already several times to create other body parts. At this stage I like to take advantage of really cool IMM Brushes (For Example) to quickly create something that looks like arms or a legs. Don't think one-dimensionally., instead, be creative. Take a preset leg in order to create your creature's fingers!

Brushes

As for brushes, I am really sticking to the basics. For any pulling and pushing there is the Move Brush. To add or remove volume I mainly use the ClayBuildup, but I will play around with its alpha (remove it or set it to “06”).
To create wrinkles and similar things I love using the DamStandard (sometimes removing the Alpha as well) or Slash3. To flatten surfaces I use hPolish or the very aggressive Trim Dynamic. The Inflate brush is useful to close holes. Typically I will dynamesh right after.
It's worth mentioning that there is an integrated function within the Move Transformation Tool (see below). For this you need to click into one of the circles and hold ALT, then you can perform some cool curvy deformations. Give it a try, I actually use it a lot!

Silhouette and Anatomy
While I am playing around, pushing and pulling shapes, I will from time to time either switch my material to outline thin or change my current material to black. This is a good way to keep your focus just on shapes in order to create an intriguing silhouette.

Once I am happy with the silhouette I will start making the anatomy believable by creating nearly all of the muscles. Taking the time to find good reference will help you a lot. Try to think of animals that you can recognize when you look at your creature In my case, a bat, gorilla and tiger. Then you can start doing the muscles.
In the picture below you can see that his pectoral muscles are basically just a bunch of elongated spheres. If you do this for every visible muscle you should get a really nice result.

After that, I will use Dynamesh and end up having a single subtool for the whole body including the head (but it is probably smarter to keep your head as another subtool).
The last step would to think about your creature's fat layer/skin. For instance, if you are doing a fat ogre, you will need to smooth out all the muscles to indicate a thick layer of skin. Yes, you are kind of destroying what you've built but everyone will notice that there are correctly placed muscles beneath.
Highpoly

Now comes the fun part: creating skinfolds, scars, wrinkles, scales… you name it. Here you can really go ludicrous with the amount of your polygons - it's up to you, or perhaps I should say your CPU.
If you have not created any lower subdivision levels, now might be the time. ZBrush will go a lot smoother. If you don't know how to do that I can recommend you an awesome tutorial by FlippedNormals
This is also the time to create some nice (custom) Alphas and drag them via the DragRect function of your brush out of the mesh. I also created different Noise layers to quickly create a texture that feels like skin.

(Take any brush with an alpha and activate DragRect)

(under “Surface” click on “Lightbox -> NoiseMakers” to choose between different noises.)
Posing, Creating Low Poly and UV´s
For this contest it wasn't necessary to have nice and clean topology, so I just used a combination of ZRemesher and the Decimation Master on each of my subtools (body with head, claws, wings, horns …).

Because each of your subtools now has its own subdivision levels you are ready to use Transpose Master. The lower your lowest level is, the nicer you will be able to pose your mesh.
A mistake that I often make is going too fast into the posing because I am curious how the model will look and then decide to go with it. Then I can't use any Symmetry anymore (except you have created symmetrical topology, then you can use “Use posable Symmetry”). So make sure your highpoly is really 99% done before you think about posing.
As for the UV´s, I decided to have one 4K map for the body, which I divided into several polygroups and one 2K map for all the other parts. By splitting up your model into different polygroups you have control over your UV seams (just make sure that you activate Polygroup before you hit that Unwrap button).

Baking
I used Substance Painter for baking (normal map, ao and my color id). You can also try using Marmoset Toolbag or xNormal which is free.
I will likely stick to everything being at default and generate my first test bake (at max. 2K) to make sure that I don't have any major artifacts. If everything looks fine I will bake my high res maps with “Subsampling 4x4” and my ambient occlusion (with secondary rays at about 256). My third map that I want is my color ID map, because I really want to use those different Polygroups in Substance Painter. For this, make sure that your ID map has “Polygroup/Submesh ID” turned on.
PBR Painting

Substance Painter is a lot like Photoshop and learning by doing (!). However, the basic principle is having lots and lots of layers with different masks. Personally, I like to start with some “Smart material”. It gives me a quick working base. Below you can see that my wings mainly consist of “Leather Weathered” and “Leather Fine Aged” with some manual modifications.

I highly recommend changing the environment all the time in order to not just get used to one, while preferable choosing between only the black and white ones. I do this because I want my model to be in a pure (colorless) environment so to speak.
.
Setting Up A Scene in Marmoset
After I exported all my maps (normal, gloss, diffuse, specular, ambient occlusion) from Substance Painter, I import my low res meshes into Marmoset and apply my maps toe the basic material.
I ended up with four low res meshes, the main body, the eyes, the floating rocks, and everything else. Which means I used a lot of maps, 5 maps for just the body, 1 emissive map for the eyes, also 5 maps for the rest of the body (teeth, fangs, horns, claws, wings, …) and 4 maps for the rocks. It was definitely not the best way of doing it, but it did the job.

One thing that you can do if you are not satisfied with how the colors look inside of Marmoset is to change the diffuse/albedo map via Photoshop or any other similar software.
For example, I adjusted the brightness and contrast, as well as manipulated the hue and saturation of the body's albedo map. Furthermore, you can change the color of your albedo directly in Marmoset Viewer. In the end, the colors of Raknadon differed from those that I painted inside of Substance Painter. I even made a second color scheme for him by just changing the Hue and Saturation of his albedo/diffuse map inside Photoshop. You can see it below.


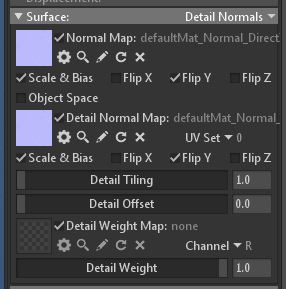
If your normal map seems weird, check “Flip Y”. I also used something that is called “Detail Normal Map”, which made everything look overall crisper (but your file size is going to become bigger).

Finally, what I unfortunately had to do is decrease the size of some of my maps in order to be below the contest's file size upload limit (<20MB) while still having the “Losless Normals” option checked. I changed the specular map of my main body from 2k to 1k which lowered the my file size a bit. After several decreases I managed to fit everything under 20MB.
On a general note, if you want to export your file with 4K maps you need to make sure that it says “Unreasonable” instead of “High”.
This is how I created my entry for this years Art War III, Raknadon, Ruler of Gravity. I hope you had fun reading about my workflow and have perhaps learned something new or found some inspiration.
At last, I want to thank Marc and the whole Cubebrush team for doing this amazing art contest each year! I am always super excited to participate and it's really a blast to see all those awesome creations at the end whether it be 2D or 3D.
Final
