Digital Art Tutorial: Making of Oliphant Castle-Crusher
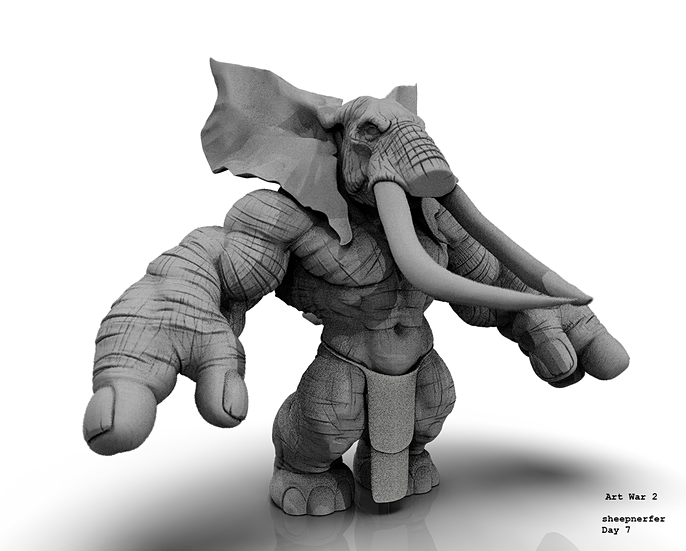
Kendrick Lepage is a finalist in the Art War 2 challenge for his character Oliphant Castle-Crusher. Here he shows us his creation process! Enjoy!
Ever since I flipped open the Warcraft II game manual with all crazy sketches by Chris Metzen and then later on Samwise I was hooked on wanting to make art for games. It wasn't until I saw the Character Modeling 2 d'artiste book with all the amazing Gears of War ZBrush sculptures by Chris Perna and Kevin Lanning that I knew the path I wanted to take.
I pretty much instantly applied and moved out to the Vancouver Art Institute. I was pretty lucky and landed a job designing Microsoft 3D Avatars for the Xbox straight out of school. While I was working there I took another 2 year online course at the Game Artist Academy from Rich Diamant and Patrick Murphy which was hands down the best learning experience I've ever had. I recently moved out to Montreal, QC to pursue the next step in my career and am very excited for what possibilities the future might hold!
In the mean time I'm working to improve my craft non-stop and taking part in as many competitions as possible, such as Art War 2!

I'm pretty excited to have made it into the finals for the Cubebrush Art War 2 challenge and was asked to share my workflow for the character, so here goes!
First off, and unfortunately for me I found out about the competition with only 17 days remaining in the deadline, so I had to kind of "wing-it" design-wise and go with the first idea that popped into my head. That ended up being a big, bulky, elephant-humanoid warrior inspired by existing African aboriginal warriors, and Indian Theyyam body paint. By avoiding any large intricate armor pieces and keeping the design very down to earth and barebones, as well as basing the forms on an elephant, it gave me a much better chance of actually being able to finish on time.
My Process:
I began in ZBrush by blocking out my general, stylized proportions with ZSpheres, and then quickly worked my way through the anatomical forms using Dynamesh until I was relatively happy with the shapes. Blocking out the anatomy and stylized forms took me a couple hours, just trying to design as I went as quickly as possible.
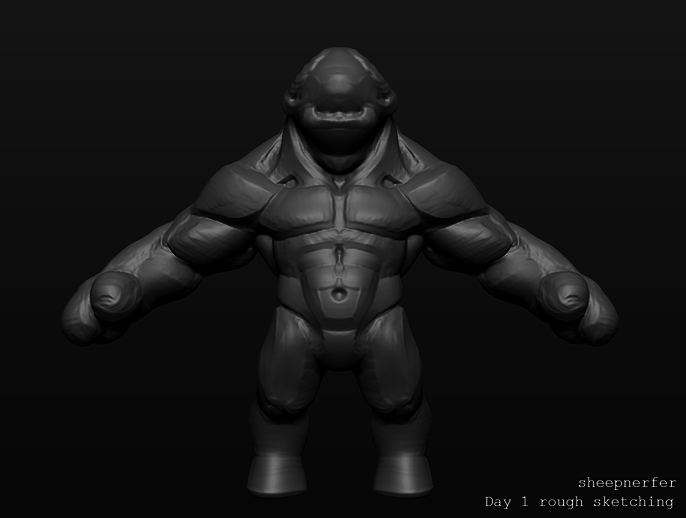
One thing I like to do if I'm making a more stylized creature that I know is going to have a lot of surface noise is to go a bit overboard with the planes and stylized form for the first pass, and keep that version on a hidden layer. This gives me the option after sculpting secondary and tertiary forms to subtly bring any hard planar forms back using the very useful Morph Target, and painting it back in with the Morph Brush (B+M+O keyboard shortcut).

Once I was happy with the general look of the body I blocked in the head. Having never sculpted an elephant head before, I decided to rough in the skull and tusks first to quickly get a better idea of the forms and then go over top with the general forms before I started to add some more humanoid character.
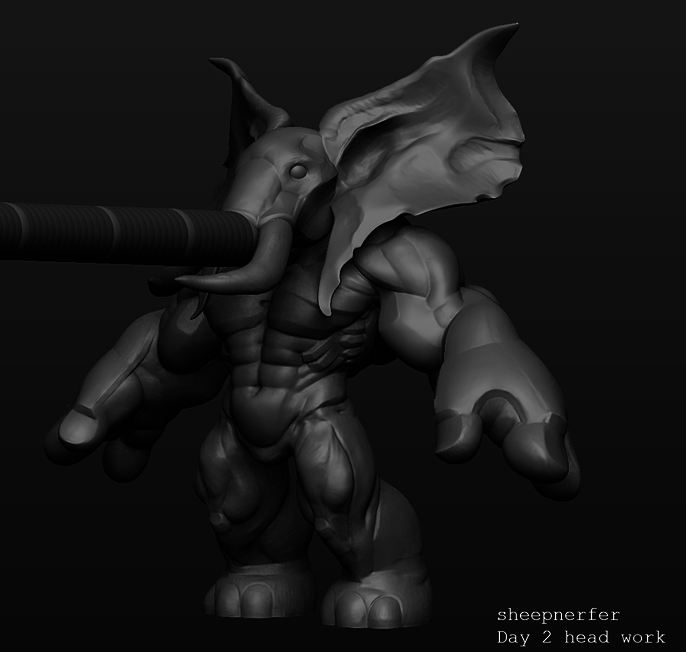
With this, I was ready to start to bring the character to life by adding character and some realism to the currently very stylized, ecorche forms. I looked up as much high-res elephant photos as I could find and studied their crazy skin-folds and, more importantly, where the wrinkles directions changed direction. Using that as reference, I did my best in a short amount of time to translate that information onto a bipedal form where the skin was much more taut, and over exaggerating a bit to keep with the stylized nature of the character.
Once I was pretty far along with the secondary details, I quickly popped my character into Keyshot using the ZBrush-Keyshot Bridge to make sure that my details would hold up under a brightly lit environment, and also so that I could see if I was going too crazy with the details.
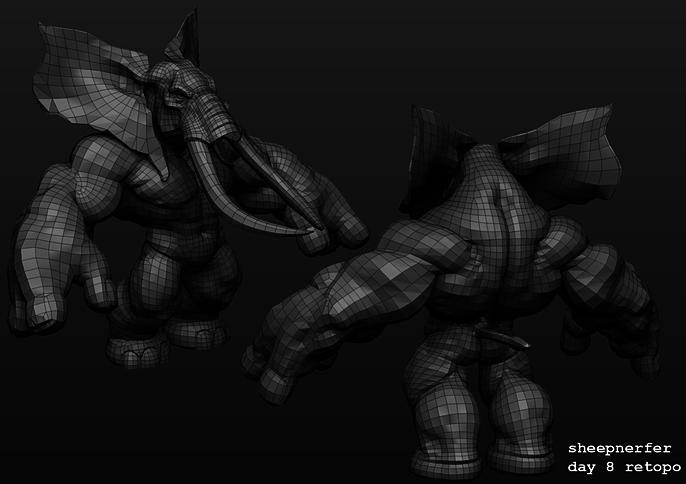
Happy that the details were holding up, but also that there were enough areas for your eyes to rest without it being too busy, I moved on to the topology phase. The final tri-count ended up being around 18k for the body (trunk included) I added a bit more topology later on to the forearms, but overall it remained the same to the image below.
For the topology, I simply imported the decimated obj from ZBrush (I find decimated anywhere under 100k triangles is fine on my pc), then under the cache menu at the top, export it under GPU Cache, and then import it as a GPU cache. You can then select the mesh, go to the Modify menu and click Make Live before using the modeling tools Quad-Draw feature over top.
Once I had the body topologized, I was able to start testing the pose I had in mind. I used Maya's Quick Rig to make a basic rig and then was able to get pretty close to the final pose I wanted. You may have noticed that I hadn't made the trunk all this while and that's because I was waiting to see the pose before I decided on exactly how dynamic of a pose I was going to give the trunk and if I wanted to sculpt it in pose, or sculpt it straight and then pose it.
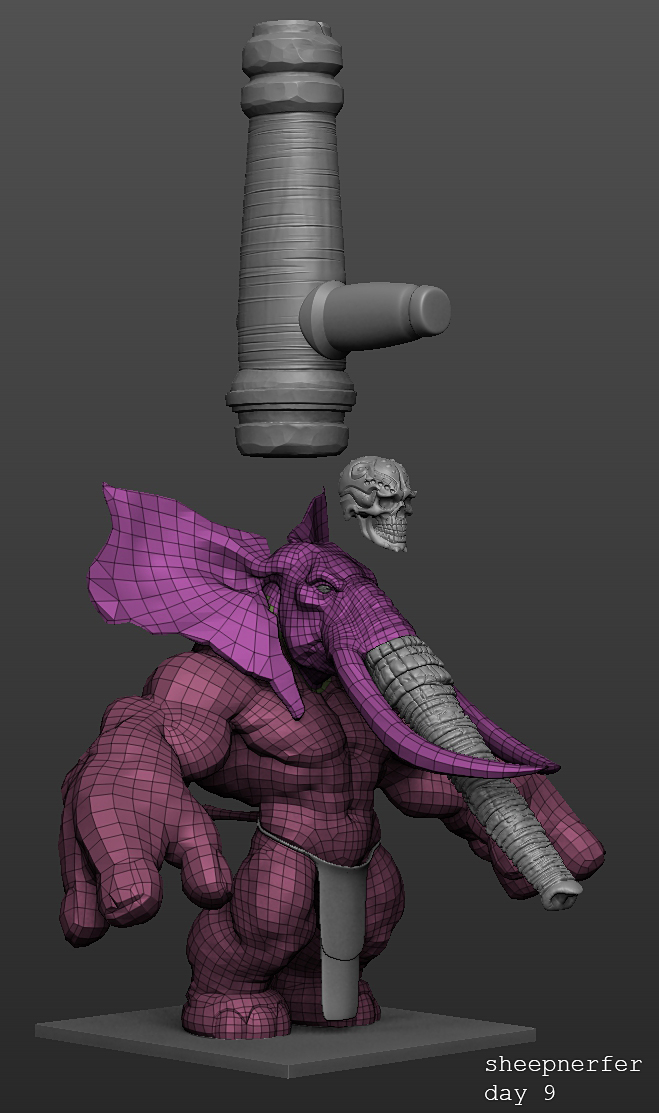
Now that I had the pose blocked out, I finally added the trunk and starting to make some of the "hero props" that required more sculpting than others.
I had the idea early on to keep the weapons very down to earth and basic to fit the rest of the elephant's design, while also being ridiculously large so that he could actually wield it. Since a fully forged weapon wouldn't fit the ascetic, I wanted the weapons to quite literally be trees, and the African balboa trees have a very unique look to them that I thought would go well with the character.
I went with a police-nightstick-meets-battering-ram design since the elephants main strength is just that; his brute strength and to see him dexterously wielding some kind of sword or polearm would look simply strange. The carved skull in the image was going to be hanging from his belt, but I decided later on not to include it, as they didn't really fit, they were going to be too small to see that clearly anyway, and I was short on time as it was.
Since the competition was being judged primarily on the final image and Marmoset scene, and not so much on UV's and workflow, I decided to bake out my maps after I had posed my character to avoid any UV stretching that might occur from my fairly dynamic pose. This would erase the need to have to go back and clean up anything and save me a bit of time in the grand scheme of things. Because of this I needed to get my high-res sculpt into the same pose as my low-res mesh from Maya. Which is surprisingly easy to do!
Simply bring your final (unposed) mesh into ZBrush, subdivide it an adequate amount of times, and then project the details from your sculpt to this new, clean mesh. Once you've done that, all you have to do is make a pose in your modeling package of choice, then import that mesh (with the correct subtool selected, while on the lowest subdivision level) and the pose will update instantly while retaining all the sculpted details.
Of note : It doesn't matter if you've UV/Skinned it at this point as long as you don't make any drastic changes (preferably none) to the mesh point order.
Now that I had my ZBrush scene set up to receive poses, I started testing a variety of poses and camera angles until I was happy with what you see below. Again, because this wasn't for production, it was only once I had the final pose that I started to model all the accessories, ropes, etc. so that I could avoid the time it would take to make them in T-pose and then pose them again after the fact. These shortcuts ended up saving me a ton of time on this competition.

Once I had everything modeled and posed, and finally set about skinning everything. And here are the uvs I ended up with. I left the accessories pretty high res since it didn't really matter. Not counting those smaller rings you see in the top left, the rest of the character sits around 50k triangles, the rings themselves a ridiculous 15k. If I had time I was going to lower them at the end, and I never ended up having time so that was that.
In terms of how I approached skinning everything, I got a lot of really good info from Marc Brunet's tutorials on Cubebrush a while back, which helped me to up my game, though due to time constraints and since it wasn't being judged, a lot of the islands are "good enough". If you are looking to improve the quality of your UV's I highly recommend checking out his "Stylized PBR Character for Games" tutorials.
Next up, I exploded (physically separated) my meshes that were too close so to avoid baking errors, and then exported the _low and _high res out of Zbrush and Maya to be baked in Substance Painter. I had a few expected errors like where the ears sit really close to the shoulders and traps (one of the downsides of baking in pose with meshes that can't be exploded), but since you wouldn't see these areas from any angle anyway, they weren't really a big deal. So I cleaned them up as much as I could in Photoshop and then moved on to texturing, seeing that everything else had baked out really clean at a 2K resolution.

After I had all my maps exported, I went about building the Albedo, Emissive, and ID maps in Photoshop (again, this is covered in great detail in the aforementioned tutorial by Marc Brunet)

ID Map
For the elephant, I used Substance Designer to quickly make an imitation of the various surface dirt, color patches, and scratches of their skin and then brought that .sbsar into Substance Painter.
For everything else I used base metals or woods, deleted any extraneous layers, and then built them back up using masks and smart filters.
It is insanely fast to set up all your base materials inside of Painter once you have your ID map set up.
Simply drag or create or new material into your layers, right click that layer, and hit "Add mask with color selection". This will open up options under the Properties window where you can "Pick Color". Exactly like in Photoshop, click that, and then select the corresponding color from your model either from the 2D or 3D view, and that's it! (needs an ID mask to work).
This is where I arrived after about an hour of setting up my materials, which was a fairly good foundation for the next step.
Once I had my materials laid out, it was time to add life to all the materials and make them feel like they had been sitting in the desert right alongside this elephant as he waged an endless war for his generals.
First up, because I knew it would take some time, was designing and painting all his crazy tattoos. The tattoos were to me a very important part of the character and made him quite unique and gave him a story beyond being a simple warrior in an army. Just thinking about the time it would take humans to tattoo the battle-history of this towering giant onto the canvas of his skin was fun.
I painted all the tattoos asymmetrically inside of Substance painter, using the Indian Thayyum ritual face painting as my primary reference, and mixing it with a bit of African tribal for the arms and torso. I did a second layer of faded white paint (doesn't make sense, but looks cool) under the black tattoos in the shape of the elephant's skull to both give a bit of a more menacing look, as well as break up the design a bit.
There were some really great desert materials added to Substance Source recently, which ended up being just perfect for both the rock base that I sculpted at the end, as well as adding to my other materials. I layered those on top of most of the materials in different ways using smart filters, so that I had sand filling in the cracks in objects, and a sandy dusting over metals reducing it's sheen because we all know sand gets *everywhere*. I was also very liberal with leaving sand on the elephant himself, as in my research for the character I found that certain elephants actually love covering themselves in red clay/mud/sand and it has a really cool look. Had I had some extra time I would have loved to make a version of this character that was covered in red mud, with white body paint instead of black tattoos.
And that's pretty much how I arrived at my final look.
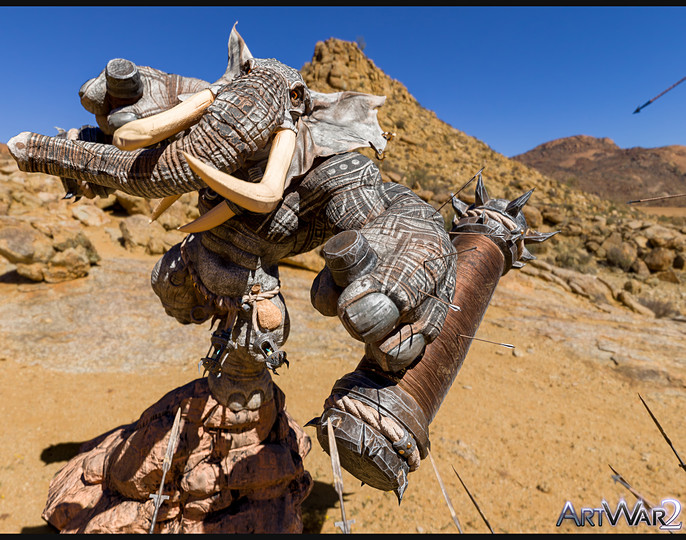
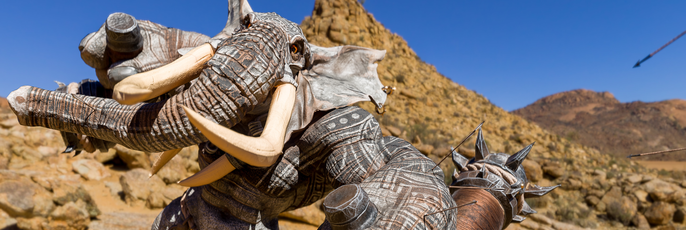
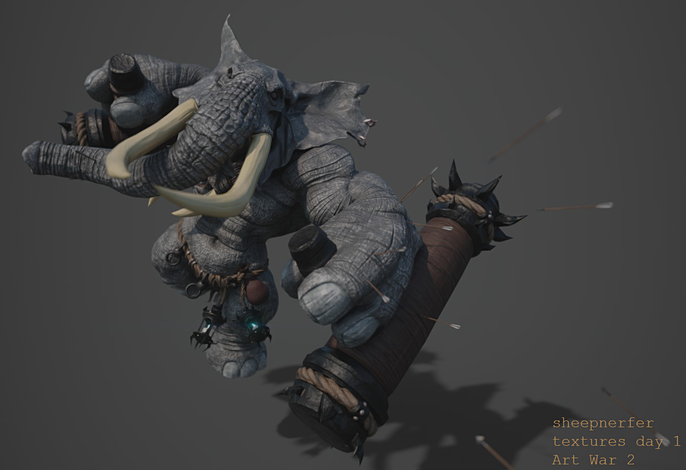
The final render was done right out of Substance Painter in the Render mode, using a desert HDRI I found on HDRI Haven. I used a redlog color profile to help blend the character into the environment along with a subtle depth of field on the arrows and spears.
I had never used Marmoset Viewer before, so it was pretty fun exploring a new tool. I used an HDRI of a night time forest in Japan I bought from the Marmoset shop for the viewer set up, and created a more "Dark side" looking scene for that part of the competition. For the most part I found Marmoset extremely straight-forward to use, and am looking forward to further exploring it's features on my next project as I didn't really have time for this one.
Anyway. I hope there's some useful information in here for someone, I really had a blast working on this guy! If you have any questions about any part of this feel free to shoot me a message on Instagram or Cubebrush.
Thanks to Cubebrush for having this really creatively open competition, and shout out to Marc Brunet for making some great tutorials that have helped me a lot in my 3D Character Artist journey.
Kendrick (sheepnerfer)
See Kendrick's entry on the Cubebrush forums.