Female Game Character Concept: Chapter 2
-Painting Techniques for Photoshop-
Introduction
This final chapter will cover everything we need to deliver to the 3D artist, starting from the black and white draft we did in the previous chapter. I will go over tips on how to create the back view, composition within the character and what to keep in mind while adding colors.
By the end of the chapter, we will have a polished concept ready to pass down the pipeline. Just like the previous chapter, this is geared towards more advanced artists with a good knowledge of color theory, composition and volumes in a 3D space.
Step 1: Three-Quarter Back View
The first thing we want to try and get out of the way is the back view of our character.
The best solution I've found is to start from the front view and very roughly invert everything by painting over it. Let's only aim for a rough silhouette at this point.
Once that's done, using reference lines, match the front and back details as much as possible. No need to go for 100% polish at his phase since some details might still change once we add color.
Spend the extra time making it accurate if you don't want the 3D artist to be raging once it's time to model it!
Step 2: Final Composition Using Colors
The idea in this first step is to get a rough of our final concept. Color has such a big impact on composition that I find the sooner it is decided on, the better.
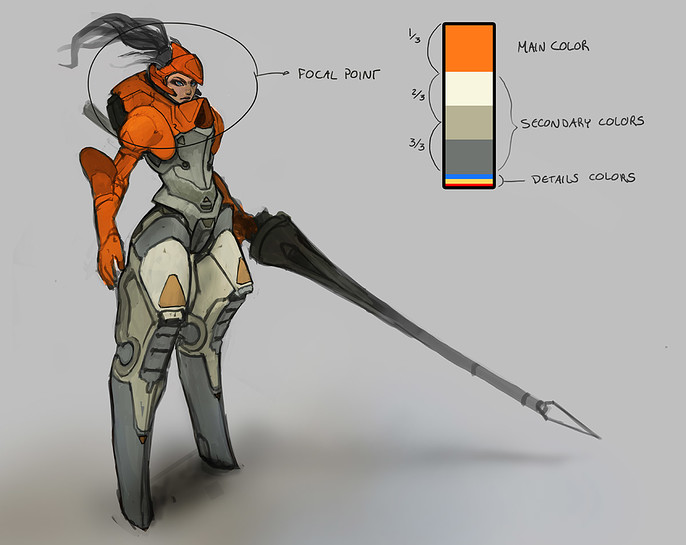
The focal point for a main character is generally the upper body or the head, so we will try to use colors to help us direct the eyes of the viewer towards this area. More saturated or brighter colors usually do the trick. Orange, white, bright and desaturated greens (opposite colors to orange) will be our colors of choice.
Our color palette for this character will be on the brighter side, since we don't want her to look like a villain
Step 3: Shading Techniques
This step is reserved strictly for the shading pass where we will be adding more light information to our volumes. Imagine a very simple 3-point light setup and add the desired details to the character.
Take the chance to tweak bits here and there to make sure all the shapes work well together now that everything is more defined.
Tweaks on the shoulders, knee pads and arms are needed to match the simple triangle shapes and straight lines used throughout the armor.
Step 4: Finalize the Armor Design
Having fixed a couple of things in the previous step, now is the time to propagate the changes to the back view and finalize it since we know everything is now final.
Just like we did for the front view, we are going to add shading to the back view as well and if needs be, colors too. In this case, since everything in the back can be deducted from the front colors, there is no need to go too far with it.
Use accent colors to help your eyes travel across the concept. Repetition works for color too!
Step 5: Material Pass
With the armor design and the colors having been done, the last stretch of this game character concept tutorial is meant to help the 3D artist understand our vision for the different materials used for the armor.
Using shaded balls with the desired material is the easiest way to communicate it. There's no need to make one for every single material, but you at least need one for each of your main and secondary colors. It's always better to try and replicate the effect on your concept as well.
And this concludes the tutorial! Hopefully you've picked up a few things along the way that will help in making you a more efficient concept artist!
Don't hesitate to add extra information for hidden parts or to illustrate how a certain piece works. The more, the better!
Pro Tip 2: Keep Your Designs Simple!
Having a simple idea behind your concepts will help drive everything else, from colors to shapes and details. Formulate a simple sentence describing your character and force yourself to use it as your "bible" for every design decision you make.
Click HERE to see the previous part in this series.


