
Old Western - Creating a Real-Time Diorama
The work produced by Shashank Verma is both dynamic and captivating and is a testament to his distinguished status and influence as a 3D Environment Artist. He has contributed greatly to many of the genre’s most popular releases in recent years including some of the world’s best-selling games such as Metal Gear Solid V: Phantom Pain and The Grand Tour Game.
The Grand Tour Game- for example- was based on the highly successful television series 'The Grand Tour'. It was praised by trade and news publications alike, including GeekWire, Engadget, CNet, and Variety. Verma worked many on other major releases as well including Time Crisis 5 and Kinect Sports Rivals.
Verma specializes in many aspects in the production of environment art having used cutting-edge technology platforms such as Autodesk 3DsMax, Epic Unreal Engine, and more. He is known throughout the industry for his expertise and as a result, has collaborated alongside other renowned leaders, among them, Dr. Mahender Singh, Founder, and CEO of Knex Inc. and former Executive Director of the MIT Global Scale Network Asia. He has also had the opportunity to work in studios which are recognized as pioneers in their respective fields including WeVR and Heavy Iron Studio- both of which are based in Los Angeles, California. Currently, Verma is working on a brand new project from Deep Silver Volition.
Inspiration, Referencing, and the Artistic Process
I have always been intrigued by Western films- especially those created from the early- to mid- 1900's. That classic and distinctive style is the main inspiration behind this project. When creating, I seek to find balance and for me, this, my most recently completed project, was one of my most rewarding as I very much enjoy created highly detailed works that set a well-defined tone.

My creative process begins by gathering reference images and creating a mood chart. Next, I decide which props I will feature in the scene. I've found it's always good to start with a rather malleable idea and then shape it into something more concrete as going forward. This process helps me to avoid any artistic blockages as it tends to build upon itself as I gradually improve the initial idea.
For example, after the idea forms, I gather reference images from websites such as Pinterest, Google, and BluePrint. When searching for these references, I focus on color schemes, mood, and atmosphere.
Additionally, I pay heavy attention to the lighting of the images. It is at this point I discern which props will complement the atmosphere and assist in the story-telling rather distract the viewer and detract from the overall disposition of the piece. In this case, the ashtray, glass, whiskey, and other background objects are secondary to the revolver. I strategically chose simplistic assets as to not compete with the hero asset visually.

Modeling
I like to start by blocking out the scene. During this step, I try to capture the correct proportions of the assets as this streamlines the process of finding the right composition. Once I'm satisfied with the layout, I perfect all of the assets until they are nearly polished. I then fit the finalized assets with textures and use them to replace the place holders in the final shot.
Going back to 3D modeling, I constructed each part of the revolver separately. In this case, all of the parts of the revolver are modeled after actuality. Here, I try not to focus on a single part of the model for too long; instead I employ the methodology whereby I switch my focus from one part of the model to another in intervals of a quarter-hour or so. This results in a kind of evenly distributed progress that keeps the whole model moving forward without leaving any details unfinished and helps to achieve a more well-rounded final product.
I find great advantage in using 3DS Max Modifiers such as Symmetry, Push, XForm, Chamfer, TurboSmooth, FFD, and Pro-Boolean. These speed the process and make the iteration very easy.

Texturing
Texturing is one of the most enjoyable parts of the process for me and is one of the most critical, too. Like any other artistic medium, texturing is all about telling stories. If done correctly, it complements the scene rather than detracts from it.
In texturing, the story is told through materials and how those materials are affected by time. The surrounding environment where the props are placed plays a huge role in defining the final look. For example, a wood log will have a different look and feel in a desert compared to a log found near a swamp.
The way the environment plays off of the material helps immensely to give character to the asset and helps in building a more dynamic scene. These fine details on the surfaces of assets are put into the model in the texturing process.
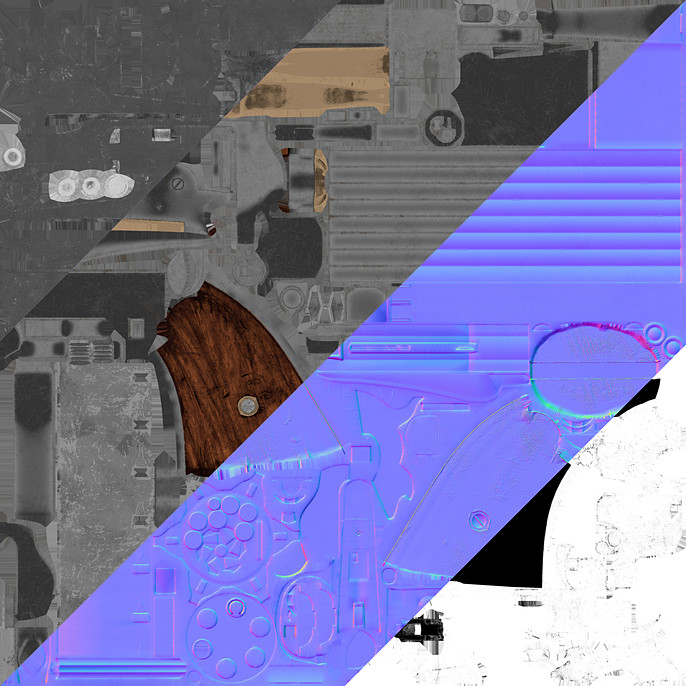
For this piece, I used Substance Painter for texturing and followed the PBR Metallic/Roughness pipeline. This uses a combination of textured images that are plugged into a material to create different surfaces as shown in the image below. Substance Painter provides great resources such as Substance Share and Substance Source. These help to speed up your process and give you the flexibility to experiment.
Substance Painter is a very dynamic program and allows for texturing in a non-destructive way. It offers many great tools like mask generators, procedural patterns and more.
Lighting and Rendering
Lighting is the outermost layer of the scene which binds everything together. It's one of the most crucial steps. Lighting sets the mood and atmosphere of the shot. It plays a very important role in both artistic and technical aspects. If not done correctly, poor lighting can result in the image appearing flat and dull.

In the aforementioned image, I used Marmoset Toolbag to render the final shot. Marmoset Toolbag is an industry-standard to showcase 3D art with a real-time rendering pipeline. It creates a virtual environment from lights, cameras, and post-processing effects. It gives the user access to many features such as lens control, field of view, focus control, flare distortion, exposure, gamma values, global illumination, as well as many others.
For this piece I am using multiple lights, HDRI, and post-processing to capture the overall mood. To achieve the best possible outcome, I tried various lighting setups and after deciding on the lighting and rendering settings, I went back to experiment with the color values of the assets. I did this because lighting has a tendency to change the local color of the assets which may disturb the desired composition. In the end I am very pleased with the outcome.
To set the scene by creating the environment for video games is a very iterative and rewarding practice.
I am honored to be a part of this exciting and dynamic industry and look forward to creating, sharing, and collaborating.

See more from Shashank on LinkedIn.