
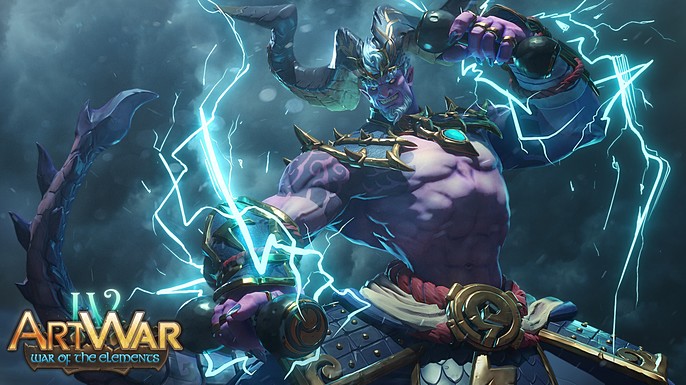
The Making of Art War 4 3D Finalist: Raijin the Thunder Caller
Yuichiro Fujita is a character artist at CAPCOM. He has 7 years experience at cinematic and game studios and a passion for creating characters in any style, R&D workflows, and exploring new softwares and technical things.
Here he shares how he sped up the workflow to complete his featured model, 雷神 RAIJIN: The Thunder Caller, in just one month.
Inspiration and Sketch
Choosing one of the four elements—Fire, Water, Earth, Lightning—was the first step to join Art War 4. I quickly decided to create a character based on the inspiration of Raijin, who is the Japanese thunder god. Raijin beats the drums to call lightning and thunder. My secondary inspiration is stylized characters like Blizzard’s.
I tried to mix Japanese god with Blizzard style.
Then I sketched.

Very First Sketch
I knew it was not enough as a design, but I started sculpting with only this image because I’m not a good painter.
The only thing I checked in this sketch was the silhouette. If the silhouette is impressive, the finished character will be impressive.
Quick Sculpt + Over Paint
Mixed process of 2D and 3D to speed up design completion.

- Quick sculpt in ZBrush
- Overpaint on whole body
- Face in several patterns
- Sculpt and Polypaint in ZBrush
After sculpting, I re-overpainted the sculpt to finalize the design. Here is the final Raijin design.

Final design of Raijin. 6 days into the project.
Then I started sculpting from this design.
Sculpt
Here are some sculpting tips.
Sculpting the armor frames

- Simple poly modeling using ZModeler and set crease LV3
- Bevel Trim Dynamic brush and HPolish brush
- Add details using stylized Orb-brushes
- Clay polish to emphasize edges
Sculpting with Polypaint
During the sculpting process, I used Polypaint to get the final image.

Sculpting with Polypaint
When you want to see the whole model without Polypaint, there are several ways to hide color.
- In the Subtool panel, shift+click on the ①paintbrush icons allows you to toggle all subtools hide / unhide.
- If you set ②Fade Opacity to 100 in the Render panel, Polypaint, masks and polygroups are no longer visible. In this way, you don’t need to change the status of ①paintbrush icons.
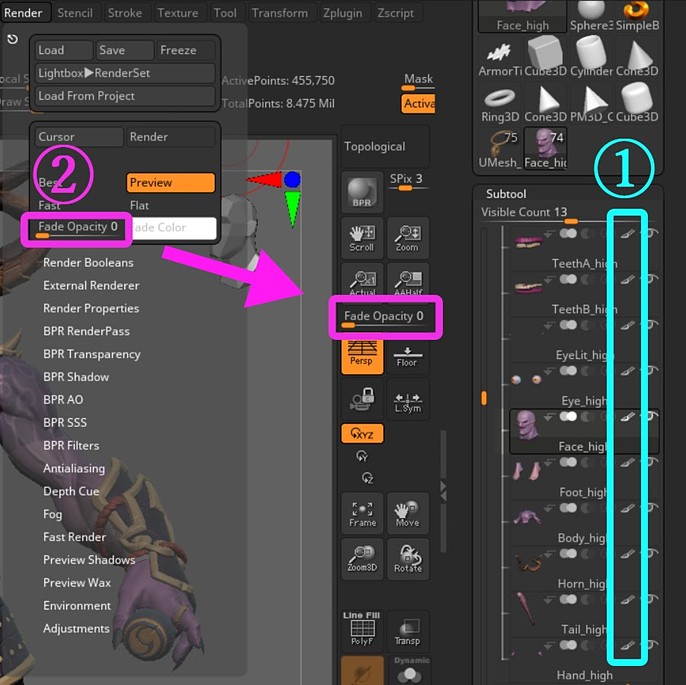
I added Fade opacity slider to the custom UI
You don't need sculpt all details in ZBrush.
It's always a good idea to keep in mind that you can add details with Substance Painter instead of sculpting in ZBrush. If you do not need to change the shape, it is basically more convenient to work with Substance Painter.
I decided not to work with ZBrush on the details of the leather and pants for this character.
Here is the result of sculpting. The drums had been removed at this point because there wasn’t enough time until the deadline.

20 days had passed from the day I joined the challenge.
Retopology & UV
In this challenge, topology was not considered in the evaluation process. So I used 2 quick retopology methods in ZBrush:
- Decimation Master for hard surface (non deformation) objects, and
- ZRemesher for deformable objects like body, pants, and head.
The retopology process of the whole body only took me a day off.
I also unwrapped UVs quickly in ZBrush with UV Master, then exported to Blender. These days, my main 3D tool for personal work is Blender.
Using two add-ons has greatly increased the efficiency of UV layout in Blender: UVPackmaster 2 PRO and Texel Density Checker 2.
Baking and Texturing
All baking was done in Substance Painter. I usually bake carefully with Marmoset Toolbag, but this time I could not afford it. Fortunately, the baking feature of Substance Painter had been significantly improved, and it baked quickly and without major problems.
When creating Albedo textures, I first created grayscale textures using baked AO, Curvature, and other maps. I added a little color to the grayscale using a Gradient Filter, marking bright areas in yellow and dark areas in blue. Finally, the unique colors that were painted with ZBrush were overlaid with Overray and fine-tuned.

Final Albedo texture
To use the PBR renderer, it is necessary to create textures such as Roughness, Specular LV, etc. To speed up the workflow, I created several Substance Painter filters that automatically converted one channel to another. The conversion function was created with Substance Designer, and nodes were exported in SBSAR format. To use the SBSAR filter in Substance Painter, I simply loaded it as a filter and then dragged and dropped it onto the layer.
With these converters, creating other textures was almost just a tweak.

- Albedo to Roughness converter for SP
- Height to Roughness converter for SP
- Normal to Roughness / Specular LV converter for SP
Effects
I used Grease Pencil in Blender to create the lightning effects. It was my first time using Grease Pencil in earnest, but I quickly realized that it was a very suitable tool to create a stylized effect.
I made a video explaining how to actually draw with Grease Pencil and prepare for exporting to Sketchfab.
Compositing
I used Blender's EEVEE render while setting up the lights and adjusting the poses. Then I used Cycles render for the final render. Due to the deadline, I rendered in one pass and did not export the AOV.
The compositing was done in Photoshop. In this process, I always focus on value. The best way to check the value while working is to desaturate the image.
What I usually do is to have a black fill layer at the top of the layer and set the blend mode to "color". I will not go into detail here, but I do not recommend using the "Hue / Saturation" Adjustment Layer for desaturation purpose.

White and gray fill layer also work
The simplest rule about value is to increase the value contrast of the part that you want to show. It's also important to lower the contrast where you don't want to show.
An advanced technique is to slightly reduce the contrast of the most important part (in the case of characters, the face). Instead, put a high-contrast element near that part and the observer's eyes will not be lost where to focus on.

Compositing process
Outcome and Future Effort
<div class="sketchfab-embed-wrapper">
by Yuichiro Fujita on Sketchfab
After finishing this personal work, it was really good that I had been able to achieve my goal of submitting to the challenge. Although I abandoned making the drums, I was able to complete the character by the deadline anyway.
I'm not satisfied with my another goal, working in Blizzard style. I needed more time to paint the textures to better blend the hand painted texture with PBR.
In my future artistic work, I would like to take enough time to draw more brilliant textures.
On the technical side, I will challenge myself to use Houdini to add procedural details onto simple objects to speed up the stylized sculpting workflow. There are many things I could work on right away, such as distorted beveling, metallic surface detailing, and random sword cuts.
Thank you for your time and reading to the end.
You can find more of Yuichiro's work here: