
The Making of 'Pisciasa of the Deep Darkness'
INTRO
Reason for Participating in Art War 2
Hello everyone, my name is Dzung Phung Dinh, founder of Thunder Cloud Studio - 3D animation & game art outsourcing company. I am a 12 year experienced artist working in games, movie and advertising industry. Before Thunder Cloud, I worked on projects of various scales from Xbox One title games to feature films during the time working as creature artist at Double Negative London. I also have experience working on various advertising commercial projects as 3D Art Director at The Color Club International.

In this article I will go through the general workflow I did for Pisciasa Of The Deep Darkness. I have been working non-stop on refining my workflow for both my personal works and production pipeline at Thunder Cloud. I am using the latest refined workflow I have to create Pisciasa plus some on-the-fly improvement here and there.

General Thoughts On The Theme
There were many art contests going on at the time I decided to joint Art War 2.
So, why Art War 2?
Because I got super fired up when I saw the Art War 2 theme & guidelines: no limitations on technical and all you need is to create a character that “wow” the viewers based on the given theme - “Dark vs Light”, there is a certain level of technical freedom in Art War 2, as well as, a lot of inspirations when I look at entries of the past challenges. I immediately know that this contest is definitely the right one for me to participate in and challenge my skills.

Overview: Experience, Ambition & Challenge
I did participate in quite a few art contests in the past but shamefully to say that I have never managed to finish them thoroughly or complete the piece on time. Part of the problem is that I didn’t really have a clear plan of production nor a time-table to keep up with the deadline, so I either didn't have enough time to finish the piece or aimed for a too ambitious project that take forever to finish.

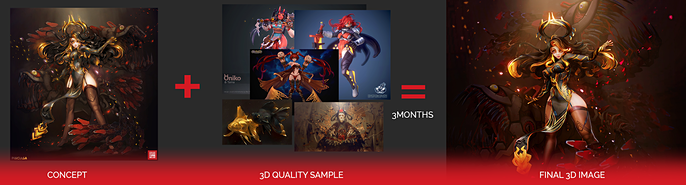
So for this one, Pisciasa, I have locked down a very specific quality standard for the piece as well as a doable schedule for the piece. There is only 3 months to make the piece so I have to keep everything balanced so that it will be ambitious enough to compete with other entries and possible enough to execute within the 3 months time-frame.
Ambition of 2D Transition to 3D Execution
In general, my plan for Pisciasa is to create a spot-on 2D illustration design first to define as much detail as possible- the final mood, texture, material, lighting, camera angle, etc for the final render image. Then everything later down the line like technical approaches, artistic direction and layout will be based heavily on this initial illustration.
Doing it this way would make most think that it might limit the imagination and my freedom while working on the piece, but instead, actually I can only concentrate on maximizing my artistic direction and creativity during the 2D. I can quickly render things out by hand on 2D to test how they should look without worrying about anything technical-wise. If I were to make major changes on fly during 3D stages like modeling, sculpting or texturing, etc it would take a lot of time tweaking back and forth until it got to the point I expect. So yes, leave the entire artistic and design decision to the 2D step.


Pushing 3D Toward Stylized 2D Challenge
One of the most challenging goals I set for myself is that I want to push the look of the final 3D piece of Pisciasa to be as close as possible to the initial 2D concept in term of every aspects from modeling, texturing, shader, lighting and render.
In most of my works so far I have always tried to match the 3D works with my concept, however there are always areas that seem off here and there, because it might be a slightly little off in every smaller stages from the model, texture to lighting etc that rolled up into a big deviation at the end. As for Pisciasa I tried to push every 3D step further and use the 2D concept as a strict ultimate guideline.

Pre Production: Design & Planning
Designing the Theme
I was working on my personal piece “Aries” before I heard about Art War 2, she is one of my OC collections in the theme of mecha horoscope & sexy girl, so I have to put her on idle to join the challenge. I want to integrate the horoscope theme into my entry piece and it will be part of my OC collection as well.
Pisces is my horoscope sign, I used it as the base design and name the character as “Pisiasa," the main design will be a badass looking sexy female character escorted by her twin mecha fishes.
At first I misunderstood that the theme is to have both light and dark in the design so I planned to have one darkness fish and one light fish while Pisciasa's costume will be mixture of a dark and light pattern divided in half by the pisces symbol under her chest in the middle.
Later on I realize that I have to choose either darkness or light, so darkness is my obvious choice since most of my references tend to lean toward the dark tone and I think it would be more interesting and easier to light a dark than a well-lit environment in UE4.

Insight About the Theme
With darkness, I immediately think of the deep sea where the water is so deep and dense that light cannot reach. They say there is little knowledge of the ocean known to mankind than of the outer space. I am always curious about the deep sea, looking at the footage of deepest point on earth (Mariana Trench) surrounded by the vast utter darkness. It gives me the same feeling of endless mysterious, fascinating curiosity and somewhat fearsome when I am looking at the outer space images. So definitely I would go for a deep-sea theme for Pisciasa.

Mood & Tone:
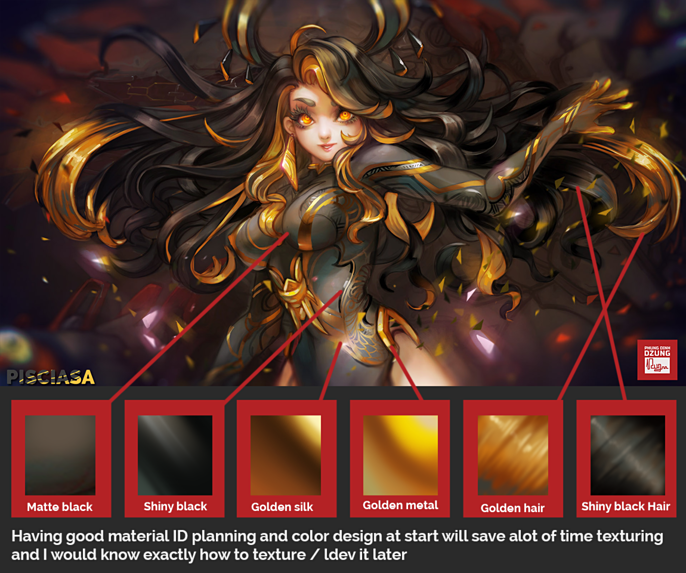
It's common sense that the deep sea theme would have color tone of Dark Blue - greenish. However, I don't really feel too attracted by the colors combination, they look a bit “conventional” and far too calm to make a “striking” or “wow” image or at least too difficult to convey that particular feeling in regard to my personal taste. Talking about fishes and color tone, I have been deeply impressed and inspired by this image by Luke Mancini (MrJack) concept artist at Blizzard, so I decided to resolve everything around this color tone - shiny golden and matte black. I start looking around internet to collect similar references.

Culture Reference - Vietnamese
I always want to add references to my national culture in design of my characters. Most of the time it is subtle details like a necklace, pattern on sleeve, ear ring etc. But this time I want to try something more prominent, I designed the entire costume of Pisciasa base on Vietnamese traditional dress - Ao Dai (no it ‘s not cheongsam, yes they are in principal having the same form but there are differentiations in every details). I have made some adjustments to make it more stylized and relevant, like sort of a war-like design or imagine if Pisciasa were to appear as a boss in a JRPG game.

Design Planning for 3D Production
I planned ahead quite a lot while doing the 2D concept to help with the 3D production later. This is for a contest with limited time-frame, so I have to know the limitation of my current 3D technique and keep that in mind while designing I need to consider which element will work best in 3D. Before digging into modeling, I break the 2D model sheet apart to have a rough plan of how to model them in the most efficient way.


Knowing that the mecha fishes or hard-surface models in general would take tremendous time to hand-paint them manually plus they are just minor characters, I spend more time modeling them in mid poly, getting the details right so that I can bake out a detail AO and curvature maps and later rely on Substance Painter to do the texture entirely.


One common mistake I see from a lot of UE4 users are is the over bloom (or lense flare sometimes). I am annoyed by this and want to avoid this from the very beginning. It ‘s not that I shouldn’t have glow (glow and bloom is nice if not overdosed), I want to have glow effect only at some specific place and only with a certain degree like in the illustration to make sure that bloom is not being abused.
Production:
Modeling
General Approach:
Since I have a decent 2D model sheet with the exact design I want it would be way faster for me to model them all within Maya using traditional polygon modeling method. Doing it in Maya allows me to stay close to the 2D design as possible with perfect surface control as well as perfect topology in one go. I can move right into UV once the modeling is done, saving tone of time sculpting, refining, cleaning up the sculpt and retopo.


Geometry is king, I tried to model everything including eyelashes and small hair strands, keeping things in form of geometry as many detail as possible. The face is the most important area, I spent most of the time modeling Pisciasa's face and her front hair. The 2D sheet in front view is the main reference view and quarter view for minor adjustments.

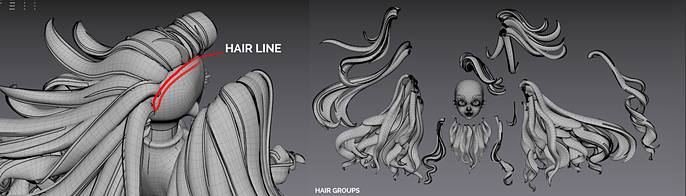
Pisciasa's hairs seem complicated at first but they actually consist of around 8 different variations of hair clumps and 11 hair groups. I draft out the hair line on the head scalp then start placing the modular hair clumps around it. FFD was used to bend them into shape that match with 2D model sheet. I prefer FFD (latice) over soft-selection because they can retain volume and overall shape much better also it’s much easier to edit FFD points to get the shape I want rather than one-off session soft selection editing. Soft selections are great when used to modify small detail like small twists, tiny tweak etc.
Improvement of Existing Base Mesh
I have been working on my own stylized base mesh over the years, improving it in terms of topology and articular anatomy (not in relation to realistic anatomy but rather the connection between anatomy features and its relative position to joint positions to achieve better deformations during animation). So between project cycles, even though each character might have different proportion or body features, but each time I try to improve the model’s topology and articular stylized anatomy.
If anyone is interested to know more about this, feel free to leave a comment then I can do a more in-depth article about this in near future.

Red line is a must-have. Lines to define critical topology flows that will affect major deformations during animation, orange lines have the same function as red lines but less important and at the same time used to define big anatomy features, these can be easily stripped down if the tris-count budget is tight. Green lines are just for adding some extra anatomy features and maintain quad flow, they are disposable. Black lines divided model in half that serving as a ruler as well as making it easier to plan continuous UV seam along them.
I have been going back & forth testing these topology with skinning animation to see if they could result in a good deformation while being bent and twisted I will continue to refine this base mesh over time but these are a pretty decent result I got for Pisciasa.


If you are interested in having a deeper look at Pisciasa base mesh yourself, you can grab it here on my Cubebrush store.
http://cbr.sh/eft3wi http://cbr.sh/gszrip
Biggest Challenge in Modeling
One notable point is that I have no problem in modeling for Pisciasa including the fish mechs, her hair or clothes. Everything is a pretty straight forward process except that I struggled to model her gown cap. Here's a draft layout of the topology I want for the hat. These flows have subtle vein patterns of the cap while not making it too complicated in model structure. I find it really hard to maintain the flow perfectly round while still having all the details caved in at a right level. I tried different ways like sculpting it from scratch, to even model it like the real structure (separated sheets rolled together) but then I end up brute force editing vertex by vertex until I get the perfect result I want.

Mecka Fishes Hard Surface Modeling
For complex hard surface structures like these mecha fishes model, I used a custom tool I wrote myself that we used a lot in Thunder Cloud pipeline call Gizmo Man (Gizmo manager) which is for managing object pivot, orientation, grouping, minoring and instancing replacement. I haven't got a commercial version for GizmoMan yet but I will soon release it during this April.

My hard surface modeling workflow is simple and straightforward. First, I blockout parts in their simplest form, using primitive or simple mesh planes. Then at drafting stage, I start working on the general flow and curvature of these planes. Once I am happy with all the surfaces and topology, I start moving onto refining them by adding thickness, bevel and details.
The entire fish models took me 18 hours to model, from block-out to final model. For workflow of how I do all the hard-surfaces of the fish, you can check out the process here:
Texturing
Baking:
Because everything is modeled in mid-poly, normal map is needed only to show the minor details so the baking process is easy and basic. I use the mid-poly models to bake with itself, for some part I smooth it up to make a quick high poly version of it.

Topology of mid-poly is high enough to retain it's shape while being smooth and able to provide a smooth curvature for the normal map and enough information to bake out other maps nicely.

The fish was baked in Substance Painter and Pisciasa was baked in Marmoset Toolbag.
Diffuse Painting:
Diffuse maps are the main ingredient.
Even though this is a PBR base project I want it to be close to my 2D illustration so the most important map of all is the Diffuse Map since it will affect most of the model surface's look in the final render. Once I am able to nail the diffuse maps the other maps will look normal- roughness and specular can be tweaked accordingly.
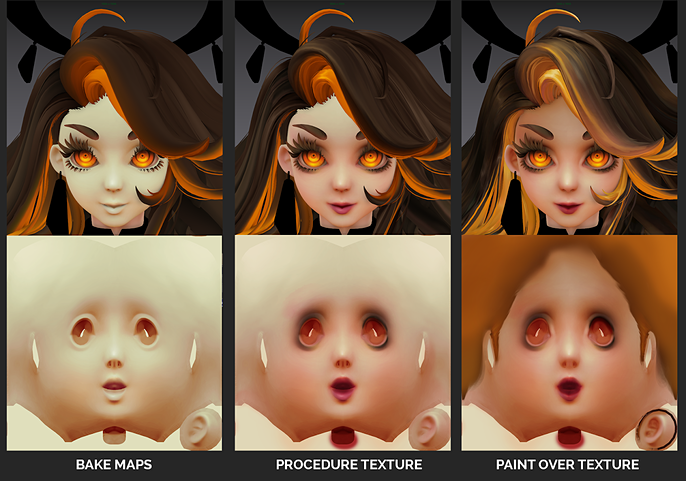
In the Pisciasa project, I used my regular hand-painting workflow with a combination of baked maps (curvature, ao, normal, translucency) and filter in photoshop to make a quick decent result called procedure texture. Then using this procedure texture as a base I start paint over on top to add details and define the stylized surface I want. You can find out more about this workflow of mine here.


Face Texturing:
Hair Texturing:
Procedure Texture Map to Texture the Face & Body
I tried a slightly newer and better way of setting up procedure texture for face & body of Pisciasa compare to my old projects. Instead of heavily relying on final paint over pass to get the result I want (which could be quite difficult to maintain both shape, shadow and color variation at the same time since I am not an expert of 2D illustration) I push the quality of the procedure texture a little bit more for Pisciasa face and body in which I have separated control over shading and color. I focus on getting all the details I want in the AO passes ( in BodyPaint3D). In Photoshop I rely heavily on color correction Node (on top of AO passes) along with the base color (with gradient) to control the final look of the skin tone. Only little paint over on top at the end to fix minor seam and detail (example of layers).

It will take forever to hand paint all the modules of the mecha fishes, so I decided to use SP and try to recreate the stylized look within SP.
The baked lighting filter effect was mainly used to recreate the pre-defined lighting look in diffuse like in stylized hand-painted texture. Small details are added last via depth map painting (vein, bolt, pattern etc)


Ldev
After I am satisfied with the diffuses, I start bringing everything into UE4 and working on developing the shader along with other support maps like normal, specular, roughness at the same time. I used BP_studio_light as a good lighting setup to do ldev.

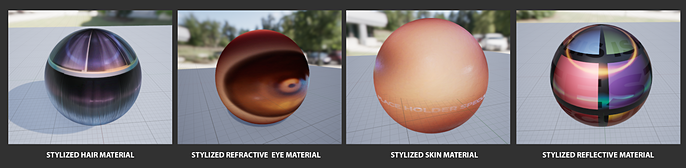
Even though I already have a ready diffuse map, the key to making a believable stylized character in Unreal that look like a lively 2D illustration is the development of the diffuse itself. If I left the diffuse as it is then it will look very static- like a picture being painted on to fake the surface feeling rather than the stylized definition of the material. I developed several custom UE4 shaders to boost the visual quality of Pisciasa texture inside UE4. These are included in my personal UE4 library.


Limitation Current Custom stylized UE4 Shaders:
I am fully aware that there is a major set back to my current shader in UE4- they don't really react to light source but rather view angle fresnel base. Until I can find a way to pass information of a light source angle into shader these shaders can be a huge upgrade to react to ligh. Otherwise, right now, they are just fake based on a normal angle rather than a light source, but to me they are good enough to achieve a final stylized look. If you are interested in having a more in depth of the whole UE4 project of Pisciasa then you can grab it here on my CubeBrush store.
Lighting:
Basic Lighting Work-Flow

This is the view of the whole scene of Pisciasa lighting setup. I used over 50 lights in UE4 to light the final scene, however the process doesn't seem that complicated. I started with key light first to lock down the very key lighting like in the concept, then I add fill light + tweaking the skylight / environment to match the shadow area color.
Then lastly I move onto to adding tiny back light along with local lights all over the place (there are 38 of them!) to try re-create the same feeling of color and lighting effect as in the concept.
Volumetric Light
Before doing the concept of Pisciasa I have played around with UE4 volumetric lighting in its new update of version 4.18 and I really like the quality of it so I am quite confident putting these effects into the final render. Before that I intended to use alpha cards to fake the effect but now I can get real volumetric lighting and shadow within UE4 which really boosts the mood up.

Particles
I tried different approaches to create the particles flow around Pisciasa such as using the native UE4 particle system or maya Particle system but none of them can create the look I want and I cannot control them to fly like in the concept. They just don't look right to me. So I come to my last resort - brute force hand placement. Yes, I modeled, textured and placed each of those particle by hand so that I can perfectly control the look of them at the end. It was a bit tedious effort but it works! Too bad that they cannot really fly like particles should, but for a still image and a turntable this is good enough and better than particle system flying around uncontrollable.

Render & Post Production: Compact World of UE4
100% of the post production is done within UE4. I used photoshop only to sharpen and control the final image exposure. I captured the final image at resolution at a much higher resolution like 8 or 9 times of 2048 x 2048 px then down res the hi-res capture to get a nicer image with better AA and clearer detail. One notable point in the rendering process is that the final scene was too heavy for my 980Ti to handle, so it crashed at 4x scale of the high resolution screencap. I had to use Nvidia Ansel which turned out to be a much better way to capture a super high resolution screenshot. The final image of Pisciasa was captured using Ansel at resolution of 10000 x 10000 pixel then down res to final 2048x2048 images so that I got a really nice AA and detail quality.

Summary: Recap & Future Plan
Pisciasa is actually my first ever project that has been full character rendered in UE4. Art War 2 not only gave me tremendous inspiration through working on the piece but also posed many challenges in terms of time frame and design. The challenge is pushing the 3D quality closer to the 2D concept, the challenge is to overcome technical limitation within UE4, the challenge is keeping myself under a strict time-frame. Most important of all I know that with better organization and self principal I can achieve a result far more than I expected within a 3 month time frame.
Participating in Art War 2 already gave me a lot more than an award itself and it kept me way more fired up to keep producing projects that are even better than Pisciasa in the upcoming time!
Thank you for your time reading this break down article. PDD out.
Pisciasa Purchase links: