


InkyLeaks - 100 Splatter FX Brushes by GrutBrushes
100 dynamic, pressure responsive Photoshop splatter brush tools for professional illustrators and digital artists
"They are AMAZING!" - Ron Hoeltge, Artist (and satisfied customer)
"So I thought your Cloud brushes were the best set of brushes I have ever used (still love them!). Then I got these spatter brushes and they are just wonderful!..." -Digital Lady Syd, Artist
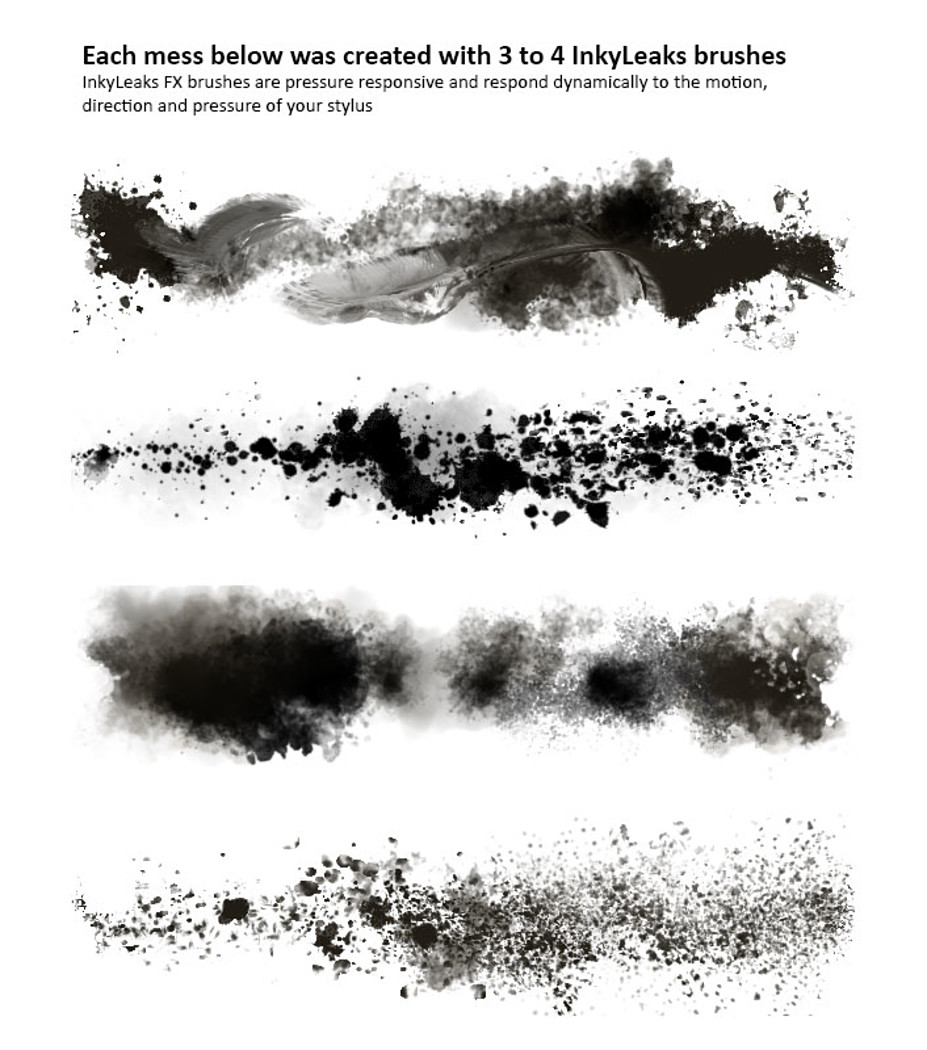
Messy, dirty, splattery ink brushes that respond to the pressure and motion of your stylus.
These are not your typical stencil stamp brushes. These Photoshop brushes are dynamic and create unique marks every time you draw or paint with them, no two brush strokes will ever be alike.
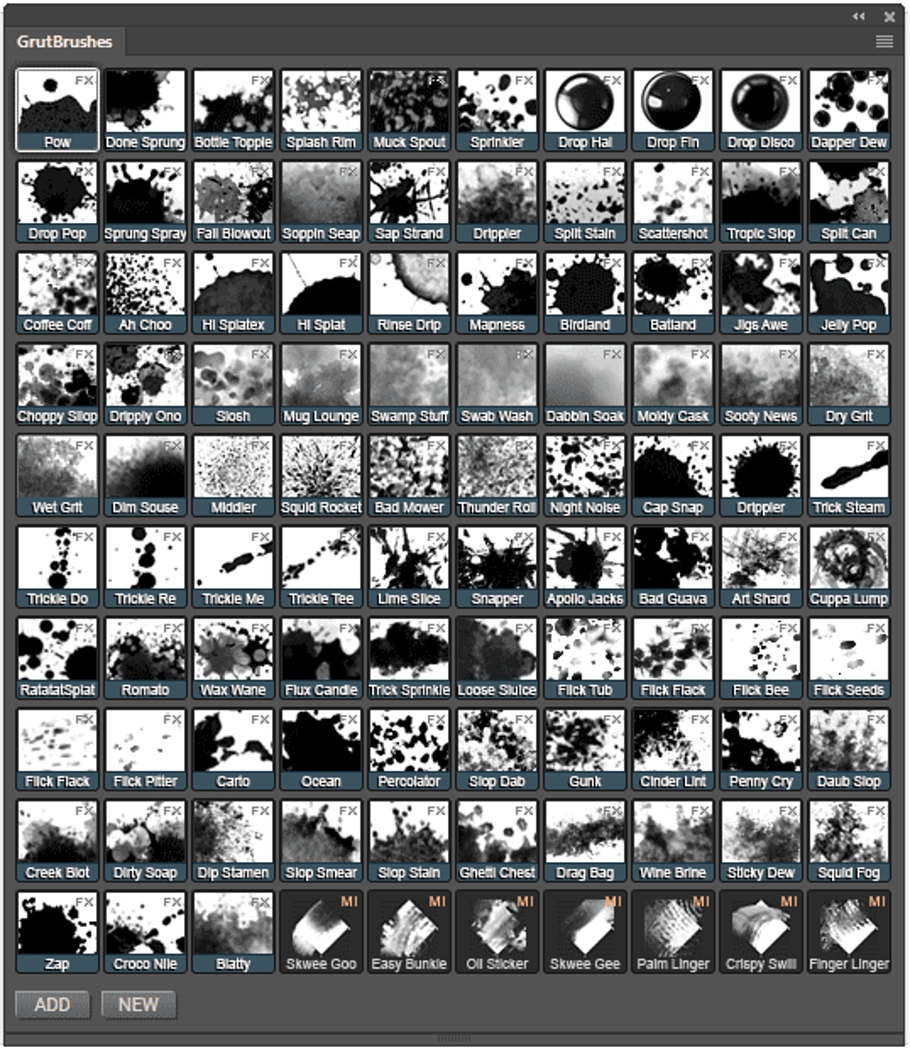
• To get the most out of these brushes you will want to use them with a graphics tablet and Stylus like a Wacom etc (though they do work without one!) • The brushes are Tool Presets (TPL files) and require Photoshop CS 5 or higher to work (mac/win) • The 7 Mixer brushes may not work in Photoshop CS (though I am not sure about this) • If you want to use them with the free GrutBrushes Plugin you will need Photoshop CC 2014 or later
A few Quick Tips and Tricks for using the Splatter Brushes in Photoshop:
Pow (Splatter brush) • More Pressure results in a larger splatter • Keep the stylus pressed and glide to ‘grow’ the splatter spot you’re on • Use the “Zap” Photoshop splatter brush for sharper edged splashes
Finger linger and Palm Linger (Mixer brushes) • Click on white and drag into the black for a white fingerprint • Start in the black and drag out of the ink spill for a dark fingerprint • Painting over the area back and forth will smudge and blur the fingerprint
Ink Drips that Splatter (Hi Splat, Splatex, Rinse Drip) • These three brushes simulate ink drops landing from high up • Hi Splatex has more texture than Hi Splat (which is opaque) •Rinse Drip is the most diluted and has most paper texture • Push harder for larger drops and wider droplet distribution
Wet Splattery Ink Stains – “Romato” • This brush gives splattery wet stains like popped ink bubbles • Hold and move stylus to smudge or remove darker viscous ink bits • Use irregular patterns for more realistic stains • Press lightly for faint weblike ink stains
Ink Spray Brush – “Sprinkler” • Good for adding spray to edges • Press down and drag in the direction you want to spray ink
Wet Egded Ink Stain Painter – “Slop Stain” Photoshop Brush • Push Stylus harder for thicker stain • Stop and Release to leave wet edge • Keep stylus pressed (don’t lift) and paint over to remove wet edging • Push lightly for faded “wiped up” ink stain
Drippy Ono (Drip Splatter brush) • Some brushes Like this one are ‘live’ and you can ‘sculpt’ the splatter until you lift your stylus • Press with medium pressure and move around to add or remove spray and splatter • Lift the stylus and the ink ‘dries’ • Black stains will build up eventually, so undo and start again if you don’t like the pattern
Trail and Spill in one Brush (Croco Nile brush) • Press lightly for an ink trail • Press the stylus harder to flood the area with a spill • Draw in circles on the spot to expand the splatter
Giant Explosive Spray (Squid Rocket brush) • Largest of all the splatter brushes • Spray Splatters radially from center of cursor • Highly explosive ink spray!
Soppin Seap (Water Stain Photoshop brush) • Brush lightly for water stain damage • Focus on one spot and paint in circles for darker, wet, ink stains • Press harder on stylus for more defined edges
“Classic” Ink Splatters (Sprung Spray Photoshop brush) • Use Sprung Spray for ‘classic’ ink splatter drops • Has built in fluctuations in ink dilution for added realism
Drip trail and streak brushes • Brushes named ‘Trickle’ produce drip trails and streaks • Useful between splotches and to lead from one to the next
Mold (“Moldy Cask” Photoshop Brush) • Brush lighly for mold spores • Keep stylus pressed and double back to paint a full black mold outbreak
Gritty Spills (“Tropical Slop” Photoshop Brush) • Thick and Wet Spills with Gritty Sediment • Jigs Awe (Photoshop ink Spatter brush) • This Brush creates random edged splatters. • Brush lightly to cover large area with ink specks • Good for controlled build up • Semi-opaque ink with lots of organic texture
Drop Disco/Fin/Hal (Photoshop ink Drop brushes) • Start by drawing a small puddle. • Tap off to the left of the puddle to add specular highlights • There must be lighter colour behind the (transparent) shiny bits • Tap/press stylus harder for larger drops • When using other colours, keep them dark for best results
Done Sprung (Ink Splats and trails) • Drag stylus with light pressure for a trail • Press and wiggle stylus in place for a splotch • Use firm pressure to get wider splash
You will get 1 file
All files previously purchased will always be available for download in your Library