
Ablution: A Digital Environment in 4 Days
Thomas Chamberlain-Keen is the 2D winner in the Worlds Challenge and a former participant in Art War. He created this quick read, mini-tutorial to explain how he created 'Ablution' in four days.
Chamberlain-Keen uses an in-depth (fictional) story to mold this successful piece but it didn't come without some regrets.
Thinking
I have been very impressed recently by design work that can be understood mechanically, featuring details that have functionality and purpose. When designing compelling new civilizations it’s these functional details that give your world depth and personality and when featured in an illustration have the ability to hold the viewers’ attention.
With this at the forefront of my mind, I wanted to create a scenario that created various problems for this new civilization to solve. I went with a semi-realistic (though I hope inaccurate) projection of the Earth’s future. Nuclear war has compounded the effects of climate change and left the surface flooded, hot, radioactive and toxic. Now we’ve got some problems to solve: Humans can’t survive near the surface, utilities of the old world have been destroyed so new sources of food and clean water are needed. In the long term, humanity wants to try and purify the Earth to make it habitable again (this ultimately lead to the name ‘Ablution’
The solutions to these problems end up being the essence of the design; in this case, genetically altered megaflora that purify water and provide a safe place for the rebuilding of cities. This solution brings with it a whole new list of problems to solve and answering these starts to give the world depth: how do people commute within these cities, how is construction handled, how do people move between cities, how is power generated, etc. I wanted to take this as far as possible in my illustration where I could feasibly explain every choice I made.
Ultimately this sort of thinking is great when employed in any design work though I feel it is more essential in the field of world building.
Sketching
Here I started exploring the shapes of the megaflora and then color and mood with some more developed paintings:
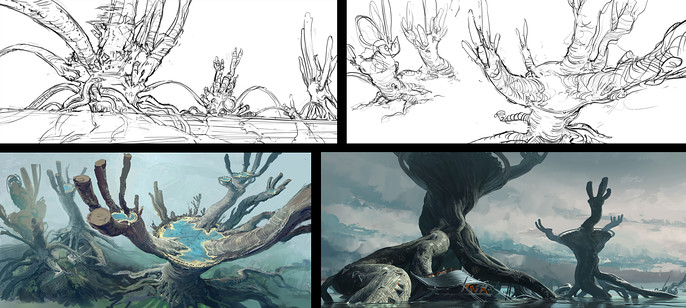
Normally it’d be better to spend more time in this sketching phase to really nail the big shapes and composition early on. I ended up doing much more composition experimentation in 3D with some simple Zbrush models. Once I was happy with a composition I took some very basic renders:
Illustrating
The composition I finally chose was constructed very deliberately to show all stages of magnification on the megaflora. Close enough to see individual people in the close foreground, a view of the entire central city in the midground and finally a view of the entire megaflora from ground up in the distance. This also gave me room to show the ruins of the previous civilisations that came before.
I combined an ambient lit render with it’s depth pass to create a base for my illustration.

This contained both the atmospheric and the physical perspective information I needed, aided with a very crude texture on the tree to show the contours of the surface (essentially acting like an additional perspective grid for the later detailing).
I now used the clown pass to separate out the big forms which would ultimately become the basis of my layer organization within Photoshop. I could now put in the basic lighting and coloration; this was mostly painted in with occasional use of photo-texture in areas like the sky and water. The process of warping them into perspective helped a lot with creating convincing depth.
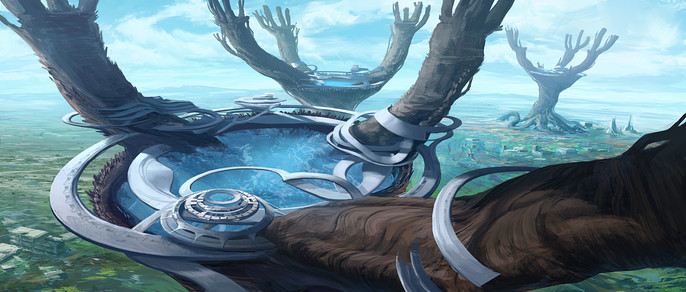
Now I started to set out the largest additional features such as the buildings on the foremost branch as it’s important to put all the large composition altering shapes in early whilst they are still quick and easy to modify.
I also introduced the human scale reference to make sure I was consistent when putting all of the buildings and other human spaces.
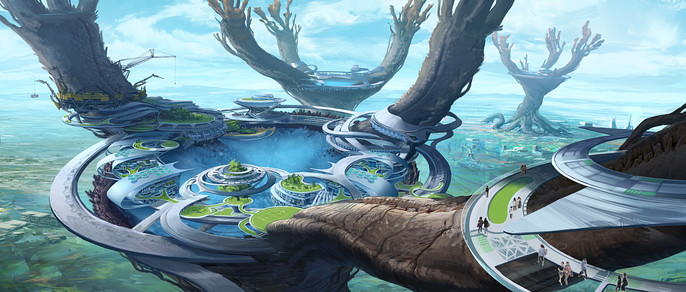
At this point I was finding it very difficult to fit all the foreground details in and I also felt I had lost the sense of height above the Earth’s surface. I was working in a very wide film ratio of 2.35:1 so stretching out the bottom of the image closer to a more common 16:9 was no issue and fixed both of my problems with the added bonus of making a better desktop background if I felt so inclined.

From here it was just a final push to add all the functional details I mentioned earlier and fix and problems with the illustration itself. I found that there was little to balance out the overwhelming cool color palette so I added a yellow-orange caustic sludge to the Earth’s surface. This also helped to enhance the contrast I was trying to make between it and the clean purified water above. I also emphasized the sunlight with stronger shadows and warmer highlights. This assisted in communicating the big forms involved like the cylindrical trunk and foreground buildings.
Lastly I added more atmospheric elements like atmospheric perspective and more obviously, clouds which I used to separate overlapping forms and further develop the feeling of high altitude.

Looking Back
My thoughts looking back now are that I could still do with more atmosphere to separate the far side of the city from the foreground. I think I would probably achieve this by making emphasizing the warm colors in the foreground even more so there is an instant read of what is near and far simply based on the colors. This still leaves enough value variation to display all the details I wanted and keep even distant parts detailed enough to act as secondary focal points.
My other major criticism would be lack of initial impact. For me this is largely the scale of the detail I have used. I find the image reads much better when viewed in full screen as the scale of most of the details are a bit too small to appreciate zoomed out. This then brings the attention to the main silhouettes which I personally no longer find hugely appealing. This is why I think a rough underpainting can often work far better in illustrative work than a 3D base plate as you are in full control of the shapes you are creating right from the beginning.
I hope you can find something useful in all this!
My thanks to all the Cubebrush staff for hosting this competition.
Tck