Mini Digital Art Tutorial: 80 Years Later
Athanasios Velissaris along with teammates Apostolos Kazakis & Michael Velissaris made it to the finals of the Worlds Challenge with their piece '80 Years Later.' Here, Velissaris takes us through their creation process and how having an architectural student on the team helped with details.
Art is a tool of expression. To an artist, 3D world building is more than just technical breakdowns and technology demos, it is the process through what is unreal and imaginary becomes real and tangible for everyone to see!
In the last few years technology has come a long way and has redefined what is possible for a single person to create. To me the creation of large worlds for my characters to live in has been both a terrifying and life changing experience. Creating a vast world in a very limited amount of time however can be very stressful to an artist that overall has a story to tell.
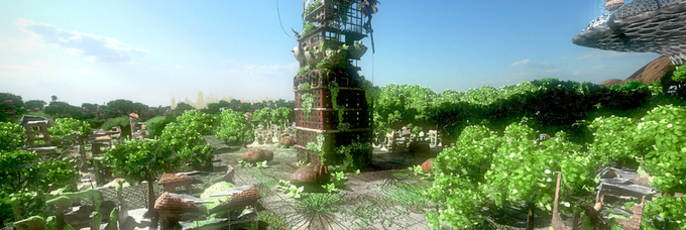
What I always begin with though is not even the story but the idea. What would a world after war look like? Camberlith to me used to be a city of dreams and progress, the hub of humanity where arts met with science. And then when war came, everything, every dream, every wish for the future had to crumble in it’s shadow. Everything had to be a living relic of futility and of how the nature always welcomes back that which is forgotten, seeing no allegiance and no creed.
Too many words? That’s right. We are not writers, we are visual artists we should be able to use imagery for that.
Concept Art
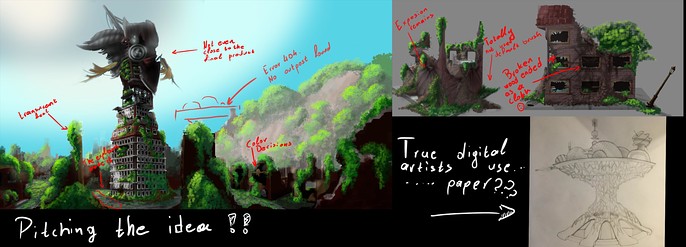
3D artists don’t have to be painters but I always recommend starting with a little 2D. Paintings, collages, photobashing and sketches are all welcome. Concept helps you get a feel for what you’re doing, the colors, the story, the mood. For me concept should focus on efficiency above all!! Get your message across as fast and as clear as possible. We had approximately 1.5 month until the final submission at that point so when I drew I knew that not much detail was required trying instead to transfer the “soul” of my ideas to my teammates.
PLANNING
Planning was arguably the most important part of the project. I’ve had some experience creating pretty big sceneries in the past and I know the workload behind them, most importantly though I know that most problems tend to show up at the very end of the process, when the artist (or far worse - - the team) is at their weakest. For that exact reason I always like to take a step back and consider some things:
• Topology (how low can I go before it stops look good, should the mesh be subdivision friendly? Can I get away with a normal map?)
• UVs (texture size, what islands should get mirrored?)
• Textures (can some textures replace topology? Is my texture going to look good after compression? Is there a way to reuse a texture or parts of it?)
• Shaders (render engine, shader capability, post_process FX)
• Particles (rain, grass, hair take substantial process power)
In my case I knew we would have many trees and bushes so my I had to find a way to make them look good on a budget and still be able to use high end assets for my main focal points.
The Textures
Our textures are a combination of procedural PBR and hand painted classic diffuse so I like to always create some custom assets for all my textures, for example after doing a regular procedural pass I always like to create some masks to mess with the perfect tiled look. Remember the additional Ambient Occlusion map you can add when texturing in Substance Painter as it really adds to the depth of a texture.

Some of you may not be familiar with Krita but you should really try it out! Krita is a great painting app and while not as strong as Photoshop it has an integrated tilling and image-stamp option that Photoshop by default doesn’t. This is the way I created the base for all the plants and then plugged it into Awesome Bump (free alternative to Crazy Bump) to create a cute little normal map.

Modeling the Tower (Focal Point)
The focal point is and should be the highlight of the whole endeavor. My environments have always been game ready low poly assets. However I think that when creating something it should always be in context. In context means that before you create an asset you should consider whether or not the asset should be inhabitable (playable) or just a prop as well as what distance the asset will be viewed from.
The specific asset, while it has a carefully designed interior, was created to be pretty low poly so the floors are planar instead of a closed hull. In the spirit of resource management I modeled and unwrapped at the same time to make sure everything will fit nicely in the UV sheet.
The same approach was followed for the ship. The ship is vastly mirrored for a very simple reason. More texture space more detail for your main asset. As a general rule of thumb if the two sides are not visible at the same time it is safe to mirror them. Make sure enough parts of the mesh are separate so as to not break the illusion of asymmetry though.

Modeling the Buildings
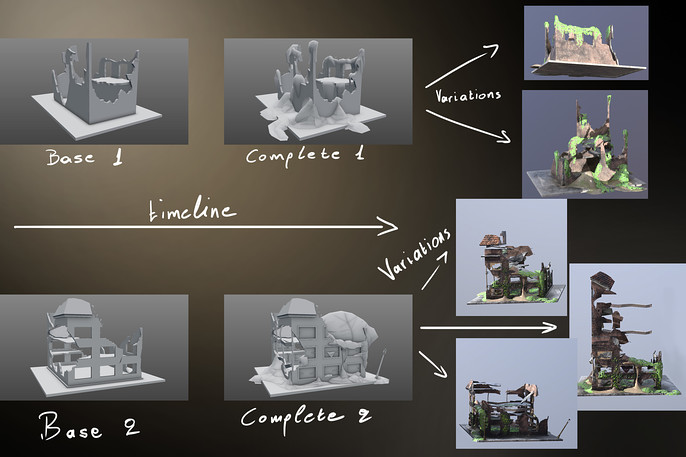
Michael Velissaris was the team member responsible for the creation of the destroyed buildings’ bases. In his own words:
I created and unwrapped the models in Blender and textured them in Substance Painter.
In both cases, the first step was to create a box with dimensions equal to those of each establishment (before they were supposedly destroyed). Then, in both models I followed these steps:
1. Using smaller boxes (the size of the windows) and Blender’s Array and Boolean modifier, I cut the holes for the windows.
2. Using Blender’s Knife tool (shortcut K) I cut the boxes to resemble the concept art. The same method was used to create the floors inside the buildings. I tried keeping minimum topology the whole time. Comment: make sure to keep extras copies of your models before heavily modifing them.
3. At this stage, almost all faces were of 5 vertices or more than! Blender can easily solve this. Using the Faces menu (Ctrl + F) and selecting Triangulate faces (Ctrl + T) the topology was immediately fixed.
4. After I was satisfied with the overall shape, I used the Solidify modifier to add thickness to the walls. At this step the buildings looked like this:
5. The next stem was to add all the details, like window frames, glass, metal rods dirt and plants:
- To do the metal rods I started with a 5 edge “cylinder”, that I then shaped to my liking
- The window frames were done using boolen and the knife tool.
- The window glasses are just planes. The shatter effect look was created with opacity in the texture.
6. After I was done, I had everything unwrapped and moved to Substance Painter for texturing.
- In both cases, the buildings were unwrapped separately from the dirt and plants which were together.
And that was enough for me. Using the two fully Modeled/Textured building bases I then created the variations for each base. Unlike the human face where small differences would give away the illusion of variation, when creating enviroment art, you can get away with a lot of asset reusability to create a versitile enviroment. Just reposition some walls and floors and add some custome texturing and you should be fine!
The Outpost
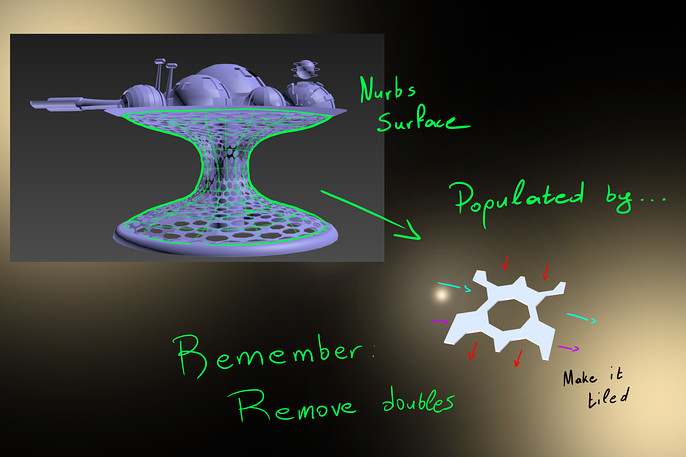
Created by Apostolos Kazakis the only person in the team who is an actual Architecture Student. The outpost refers to the tech tower that we have in the background and story wise it is supposed to be created by some time travelers that saw the value of the area but wanted to compliment the natural element and so they decided to loosely create a tree looking architecture.
Apostolos really knocked this out of the park with his reference use + brainstorming but while the modeling was pretty easy the part that really made me anxious was the grid like pillar. I actually thought that we should do it with curves, however as Apostolos used 3ds max he discovered the Populate plug-in. In a nutshell the Populate Panels functionality allows for a component to be placed on Nurbs surface. So the only element that needed to be modeled was the singular component itself, allowing for a procedural workflow . I only added my touch by removing the doubles of the surface so as to make it a little easier to unwrap. Full tutorial used:
The Nature
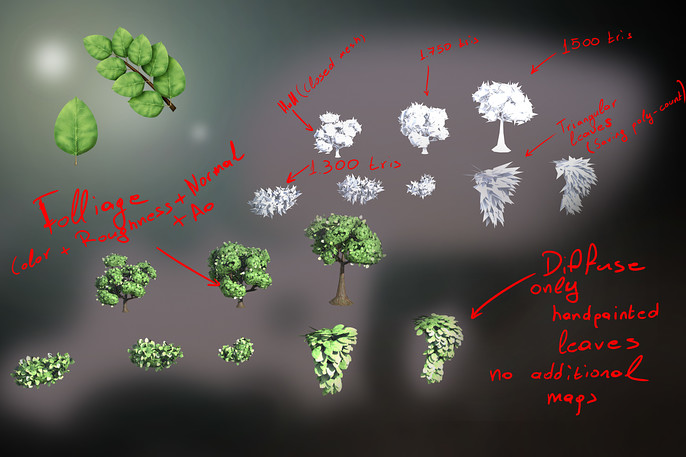
Before creating the bushes and trees I took some time to decide on stylization. I love the particle feel of the leaves on both the trees and bushes. However being aware of the poly-count limit I knew I couldn’t go on a leaf by leaf basis. I’m against reinventing the wheel there is in my opinion no need to, however going the planar branches route was not very satisfying to me either. So I decided to take a halfway approach: two sided hulls for the main foliage and some minor triangular leaves.
The result was cute round trees with some tiny leaves to sell the illusion of depth.
The way that I approached that from a modeling stand point was:
• Manipulate sphere for foliage core
• Model low poly trunk and Branches in Speedtree
• Decimate in Blender
• Use a brush to add hair on top of the aforementioned spheres
*each strand was a leaf triangle
The HDRI
Not much to be said as it was mostly handpainted but I’ll leave you with some screenshots of It’s creation

And that’s it!
I won’t get into the process of the creation of the other assets as I don’t think that it’ll benefit the community but on behalf of all of us I would like to thank all of you for reading and also to thank the wonderful Cubebrush staff for this opportunity.