Bohdan Lvov's Creation: Under the Dome
This digital art tutorial takes you through the creation process of 'Under the Dome' a 2D animation.
Bohdan Lvov is a self taught artist who began using Cubebrush to learn and grow his craft. He is one of the finalists in the Worlds Challenge with his piece 'Under the Dome.' In this tutorial he takes us through his workflow.
Hello, my fellow art-lovers!
My name is Bohdan Lvov, and today I will tell you a story of a struggle, hardships and revelations on a path of creating a brand new world for the Worlds Challenge. My work (or my world, if you want to be more specific) is called Under The Dome and this article is about it. So pour your favorite drink for drinking and food for eating before diving into this relatively big article.
Whole story of building of this world is divided into chapters beginning with:
Idea and Philosophy
The main goal and interest to me was to create not just an image, but a whole world which obviously will be depicted in a picture.
So, when I read requirements for a challenge, I started to think (who could guess, ha), and came up with a whole file, which was called 'Ideas.txt'. At this point I wasn't even sure if I want to participate, so I decided to make some ideas and figure out is there something interesting, or just garbage:
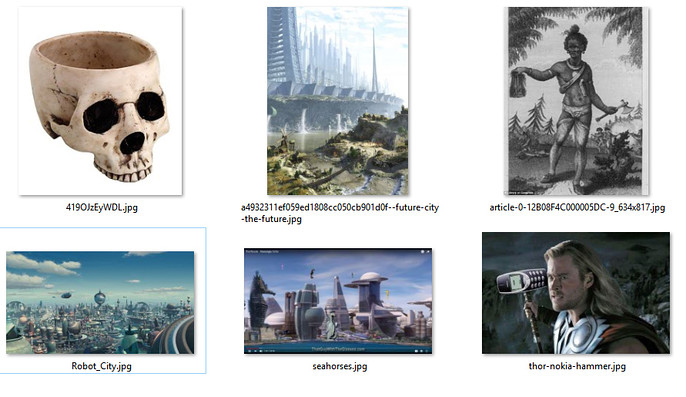
1. Villagers at the bottom and a sci-fi city at the top. They're worship or attacking a sci-fi city.
2. Cavemen using common tools as primitive - Nokia 3300 as hammer.
3. Great warrior wearing skulls of defeated robots - some built from these robots - puny human eat soup from the head of robot as a bowl.
4. They're all in nuclear shelter and declined to the stage of caveman - Doctor Who's ship close to a black hole and our beloved Vault 13.
5. Seahorses/other underwater creatures grab stuff from the deep of the ocean like sunk ships and submarines, evolved and made it their houses - A.I. scenes - inspired by NC episode about the Room.
Those few quick ideas were strengthen by a clear images, which is, using the power of the internet and I was able to quickly grab and use as my reference points, you can see a bunch of them below:
I wrote this in July, thought a little more and totally forgot about the challenge for about a month. That was a part of an ingenious plan to avoid blurred vision of the situation and reevaluate ideas by myself.
In this new weird reality I decided that first idea, with two parts of this world, was too expensive to do, especially since there was a requirement to do a fly-through video, which in on itself required careful planning of resources and whole scene. Yeah, if it wasn't required and a few stills from different angles would be OK, whole thing could go differently. But what's the point of doing it in 3D if you can't interact and/or move in space, right?
Creating not only a city but a village around it would require to do A LOT of assets, and since I preferred to work on my own on this one, it could lead to a imbalance in a density of content due to quickly approaching deadline, which was less than in a month from that point. Back then I didn't know it would be extended till the October, so it was a clear requirement from the concept: don't be too big, but representative. It's always better to do something smaller and meaningful than monstrous and pointless, in my opinion. So this idea was abandoned altogether with a fifth one, about seahorses dominating the planet, because it also required some kind of advanced city-scape. More than that: I just finished another work with an underwater theme, so there was a little fatigue of this setting.
More than that: the original plan was to make it fully interactive in Marmoset Viewer, so huge arenas weren't the best case scenario.
Seahorses themselves were too tempting, so I thought to put them in EVA suits in space or just on a land, but it started to feel too complicated and I needed a self-explanatory world and an image of this world as a result.
Concept with a warrior felt really strange for a version of me because it was more appropriate for a character challenge, not environmental. And I needed a focal point, which was a requirement for a 3D submission. It's almost as if organizers knew that 3D artists may screw up the fundamentals and forget about this aspect of their scenes. ;-)
Only the best part of this idea survived - a little bowl, made of robot head, which even ended up in a final picture. So at this point only two concepts were left: cavemen with primitive tools made from something once advanced and a nuclear shelter.
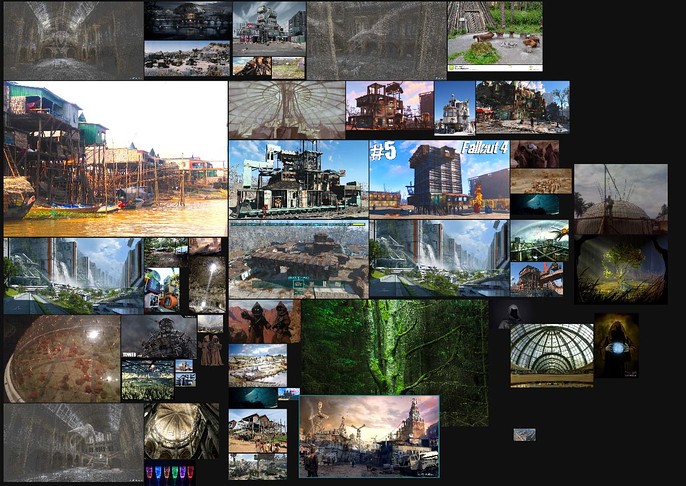
After some time with both of these ideas kinda merged to one, from which it all started. After collecting some inspiring references from Fallout series, just post-apocalyptic art and even from star wars it was good to go and make to a final concept.
At this point the main decision was made: whole setting is a stuffy, claustrophobic place which is only place of safety for it's dwellers, whoever they are. To make it more resonating and contrasting I decided to make this place grungy and rugged, and glimpses of a outer world are meant to be bright and sunny.
So the first draft was like this:
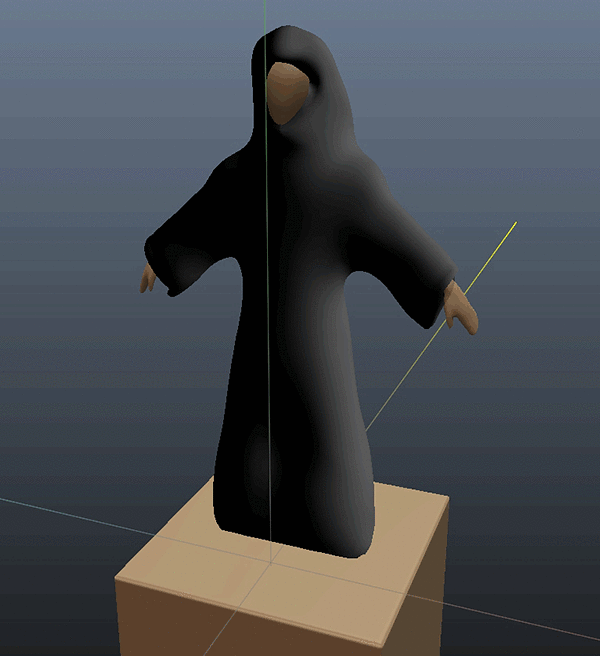
It's all happening in a huge dome, sci-fi in the past. Villagers are mutated and disfigured, like this BLOB from INSIDE. (spoilers!)
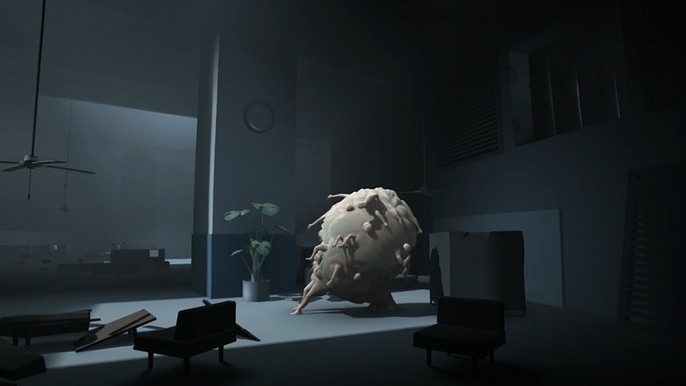
They're wearing hoods to hide their disfigurements. Mutations caused magic abilities to emerge, but also gave ability to die under straight sunlight.
So they can't leave the Dome when it's day. At the center is a giant religious monument, which reminds them about how healthy and happy life before the war. It's something ridiculous, like a giant fork.
Some guys nearby are making barbecue via magic - throwing fireballs or fire-stream or smthn. We can see dots and corridors coming out of dome - to other domes, presumably. Also there is open door to a street, where we can see all bloomed and VERY bright, before the exit sign "Don't go there" hovering in the air, driven by magic is maybe animated.
On the sides of dome and in different places we can see pipes with strange liquid - mutagen with which they're experimenting and trying to make magic powers more effective. Pipes are magical, maybe like in Green Lantern, maybe it's just supported by magic rays.
Everything is build from war tech and pieces of modern-future world, dwellers eating soup from helmets or heads of robots. Buildings are built from military objects.
In a file with concept art I found reasonable questions about all of this: Why are they opening the hatch? How is light coming into the dome if it's so dangerous to them? Maybe the monument is a tree and it needs light? In the final draft it ended up to be a tree along with some other minor changes.
Also the name came in at this moment: Under the Dome, which is a reference to a Thunderdome from Mad Max 3.
Also there came an explanation about the Dome itself: Why the hell they are staying in it? They can't leave the Dome when it's day. Dome itself was built as a vault before the War. Unfortunately for the dwellers of it, there's is not much of it's original load left, but since there is no choice, poor guys have to maintain what they have. No water chips either.
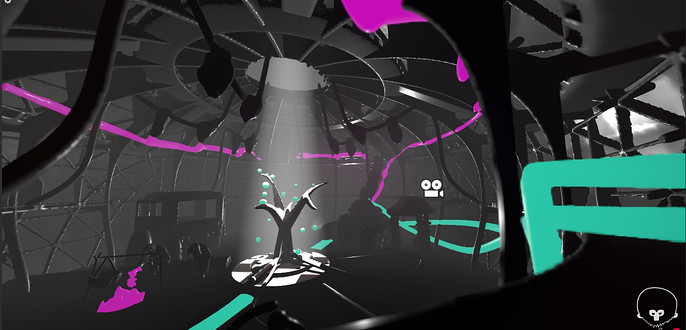
In the center I placed the giant religious monument, which reminds the descendants of war generation about peaceful and not transfigured time. It's not just a monument - it's a living tree which is powering whole dome and that's why they need light inside of their home - just so the tree won't die without it and will be able to produce Magic Goo (which is the legitimate name of the green thingy floating in the air all around the Dome. I needed it not only for a visual interest, but rather as a source of light).
As you can see, habitat of the survivors of the last war is pretty rough and not very comfy.
Still, that's everything they have.
Now I knew what is it all about! Only one small detail between me and the final renders: necessity to actually do it.
Hardships and Struggle
At this stage it was time for blocking. The whole pipeline contained Blender, 3D Coat, Substance Painter and Marmoset Toolbag. The last one was used out of simple curiosity: from the beginning I knew that I wouldn't be able to fit the whole scene in 20 mb of viewer, but wanted to explore Marmoset itself. And it's great.
3D Coat is another amazing tool in my toolbox, mainly because of VOXELS. And it's also a way to combine for creating 3D models, in which you can model, make retopo, unwrap and even texture the whole thing. Main difference between voxel workflow and the polygon one is in freedom of manipulation.
Quick example: if you need to cut through the object, what would you do? With a polygons you have to change topology, delete some faces and bridge holes to each other. With the voxels you can just delete a mass and 3D Coat automatically will recalculate whole thing for you. There is a real way to using masses in 3D, not just a surfaces.
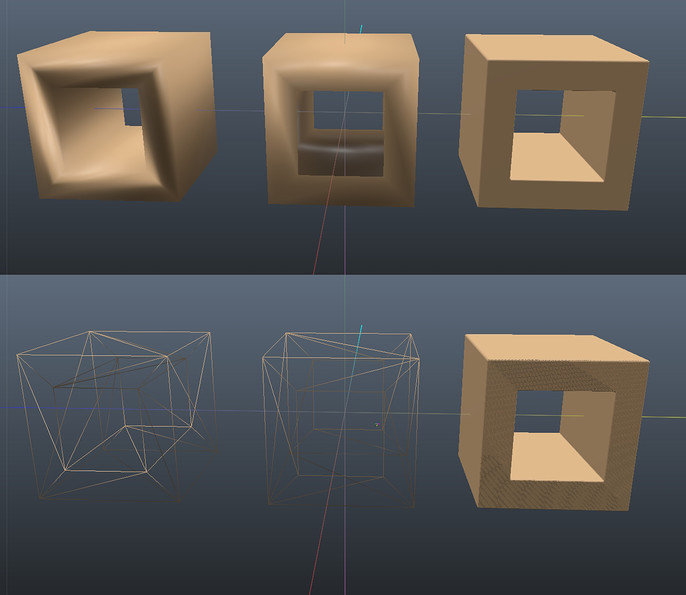
Of course, as you can see at the bottom of the picture, voxels require pretty dense resolution and there is no topology in here. And that's exactly why it's so good and natural for a volumetric concepting. More than that: you can actually use boolean with this kind of workflow and don't be afraid that it ruin your topology, because there isn't one. 3DC is fine with that and don't even tries to crash. That's the main reasons why I used 3D Coat as a main blocking tool.
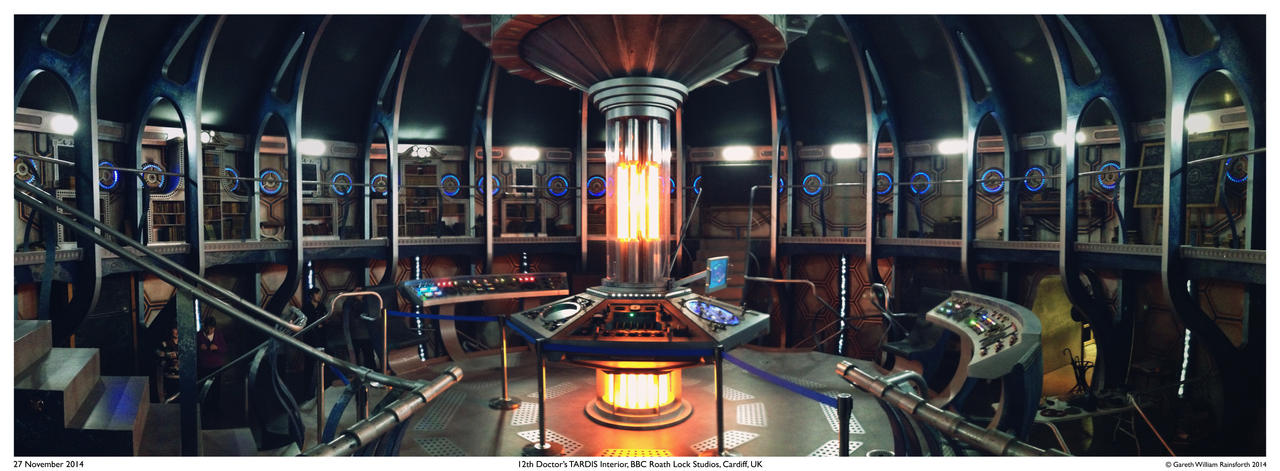
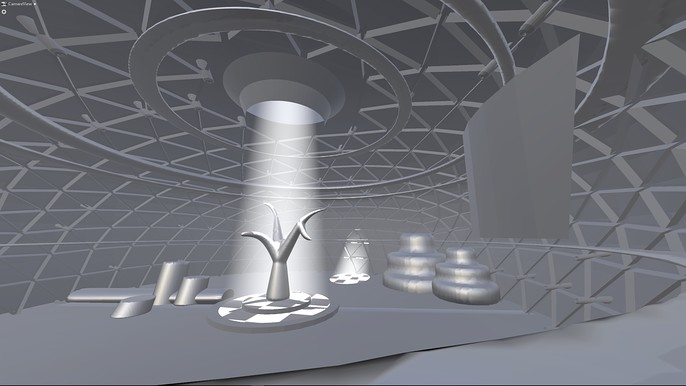
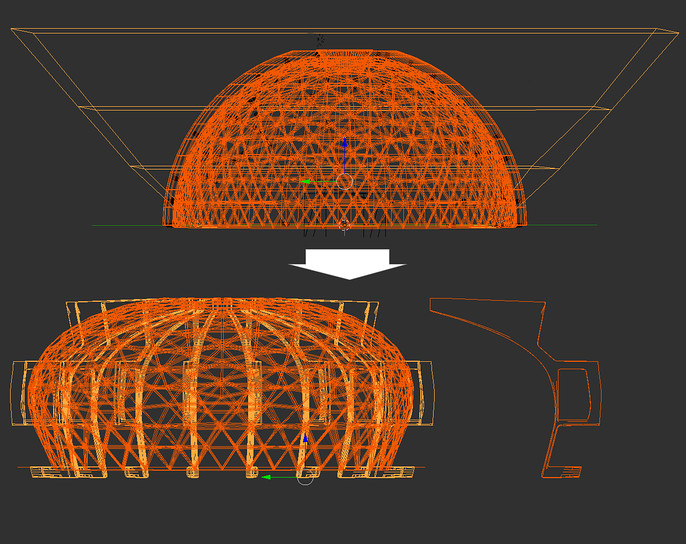
Main inspiration for the structure of Dome obviously was an interior of a 2014 TARDIS from Doctor Who: keeping in mind that I have to somehow animate camera in this space, I choose to take this concept as a base. Since it's a really working TV-show set and already optimized for a beautiful camera passages, it had to be just taken up to 11 to fit my purposes.
Time rotor was replaced by a column of light, central floor was eliminated, but few passages were added. At this point the very first blockage were done:
That looked kinda like SOMETHING but not exactly what I intended to do. Of course, there is a cage from Mad Max's Thunderdome, but it kinda falling apart without some rib cage, which will reinforce whole form of structure and help to drive viewer's eyes.
First pass was designed in 3D Coat...
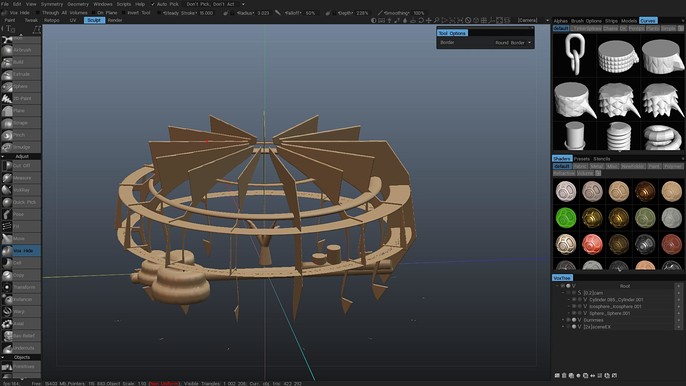
… and exported even without retopology to a Marmoset. Please, notice that even with decimated count of polygons 3D Coat exporting A LOT of them so Marmoset sometimes chuckled other models with millions polygons with a hideous topology. So be careful, if you are trying to do something like this.
After few failed attempts to load the scene, at last it worked, and that's what I saw:
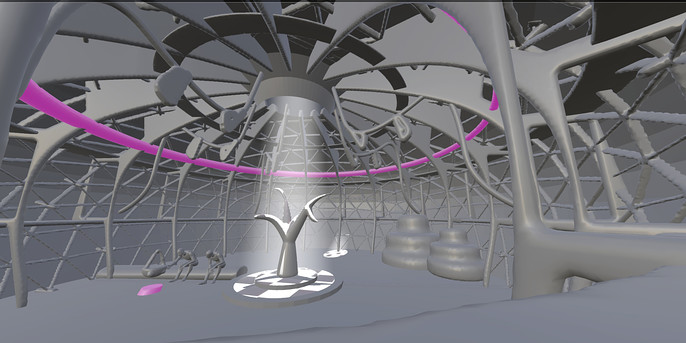
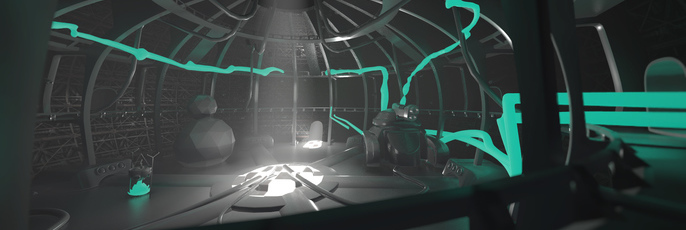
Much better. Adding characters helped to make this space habitable. As you may notice, whole geometry of dome changed. On first iterations it was a sincere hemisphere, but later, with help of lattice (because what 3D artist doesn't love deformers?) it transformed into some kind of squashed droplet:
But it still looks dull. "What to do?" - I asked myself. Fortunately, I found magical and legendary button to make it all looks cool, which in Toolbag's terms is called Global Illumination section of render settings. Obviously I turned on everything:
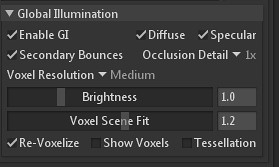
And voila! Coils on videocard started their whiny song and the image became much juicier, more beautiful and better overall.
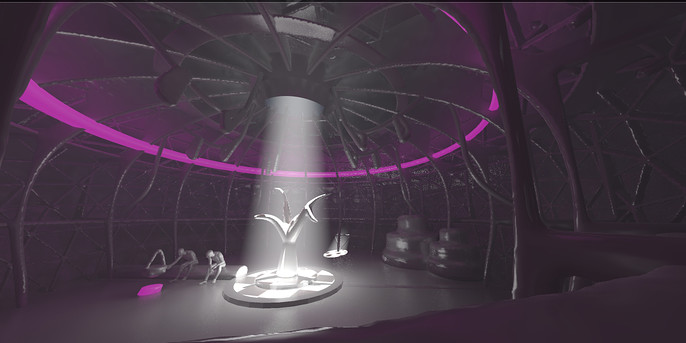
But something was still missing. And that "something" is nothing else than contour light from a back of observable object. Fortunately for me the whole scene is set indoors, so I had a luxury to set an auxiliary light in way that it would shine directly in camera. Of course I needed to define contour of every object, so light had no cast shadows. It was unnatural, cheatish, but a beautiful solution.

As you can see there is another frankly unexpected thing: back light. The back light made fog look brighter, so the whole space of the dome became more expressive, solid and all parts started to fit little bit better with each other.
After some further exploring of this world and an image of it, I ended up with pretty much finished blocking which contained all the required objects have descent composition and post-effects, like DOF.
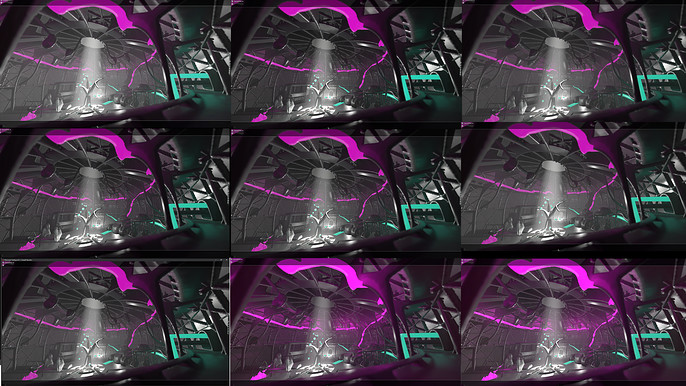
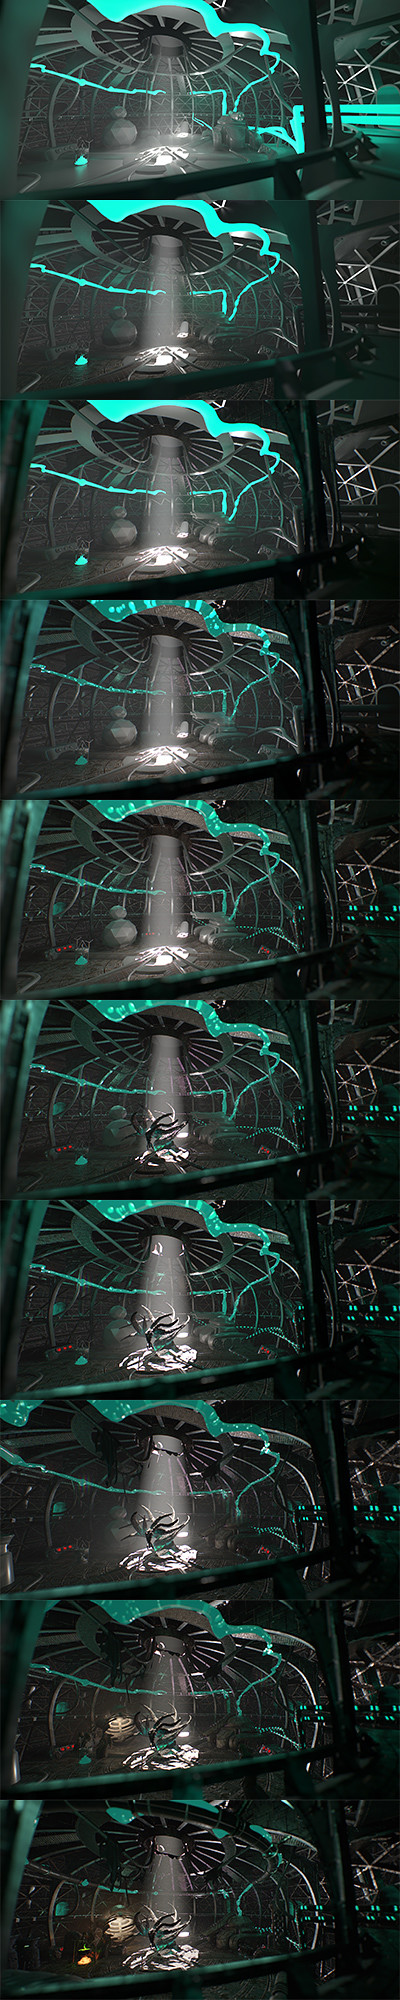
And that's where it all started: countless tweaks of fog density, render settings and light brightness. Remember: don't let it distract you. If you catch yourself changing some value from 0.001 to 0.002 hundreds of times - let it go and do something else. This loops (which is something to do with a procrastination) can be a real cause of loosing control on a project. Maybe you, my patient reader, encountered this state before - when you see what isn't there. Not in sense of hallucinations, but after a while you start to feel like the whole work is too bright/dark/colorful/etc and you can easily tweak it using a few simple ways, like changing values. That actually sounds like some kind of cheap click-bate. Then you get distracted or just change your focus of view. After a while you are getting back to work, rested and thinking other thoughts and start to notice that it looks not like you remember it.
Familiar circumstances, aren`t they?
That's why you have to break the circle and avoid this state of mind. On a picture you can see just a few renders which I made in that state of mind. As you can see, no one (including myself) would be able to tell the difference, but hours, days and weeks would be lost. That's just a portion of literally hundreds renders from that tweaking session. And they looked almost identical.
In this case quickly approaching deadlines is usually helps.
Around this time it was announced that challenge is prolonged till the 17th of October. And forum automatically generated really scary text in my WIP thread:

Fun fact: I participated in a few challenges, when organizers extended deadline. Oddly that gesture, aimed to help artists, often backfires, because participants which tried to make it till the original date relieving from that pressure and the seemly new deadline doesn't have the same effect on them. The feel of danger is not real anymore. As the result, sometimes even less artists make it to a finish line than with the original conditions.
Fortunately for me, even after 27 days of doing nothing I had enough time to finish the work, but I have to admit - there was much less desire to do than a month ago.
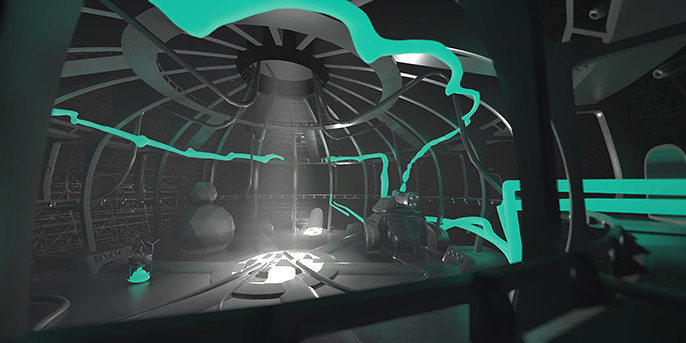
On other hand because of this 27 days of hiatus I was able to see it all anew and leave the color of magic liquid alone, just killed instantly this acid-party-illuminating materials.
Green Goo for a win!
Tricks
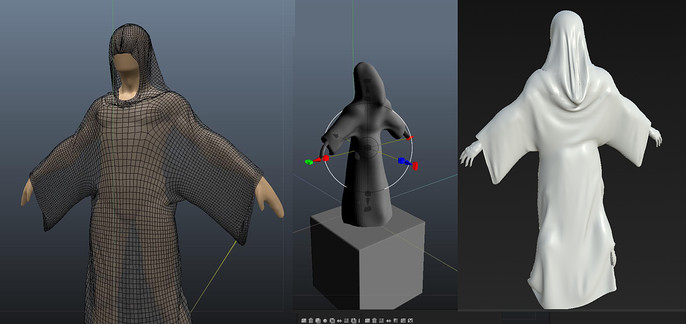
As you may also notice - geometry became less noisy: that's because I lied and in those 27 days of emptiness in the WIP thread it was ineffective, but still used for a retopology of raw voxel geometry.
Retopology was done in Blender using technics from the amazing tutorial from Zacharias Reinhardt.
I also created UV's in Blender and since I'm new to it and still just blown away by this piece of software, I'll share with you just one tiny-tiny trick. Let's say you have a circling object (floor in my case) and you need to make a straight rectangle with it's UV's. In Blender it's very, I mean, VERY easy, and you can do it literally in three clicks!
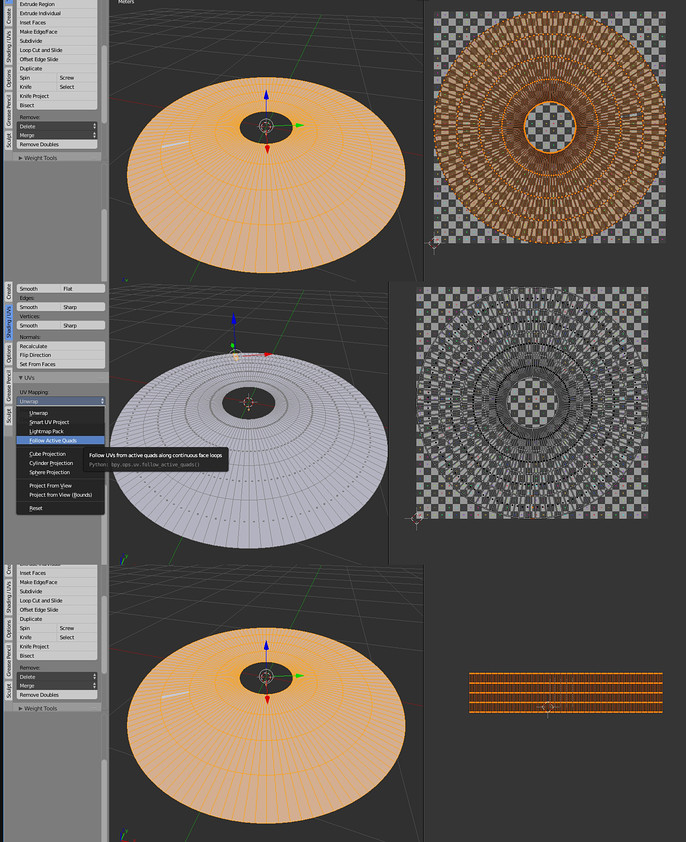
Oh boy, it's so good! Just choose one freaking quad and it will unwrap whole thing according to it's direction! You may think that placing of the final UV's is strange, or it's too dense closer to the center, and will be right, but since I intended to use tileable texture for this piece of environment, it's ok. Just look how it turned out.
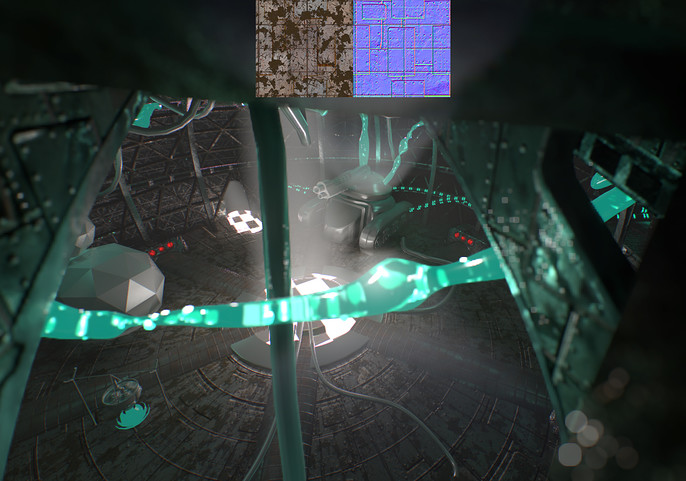
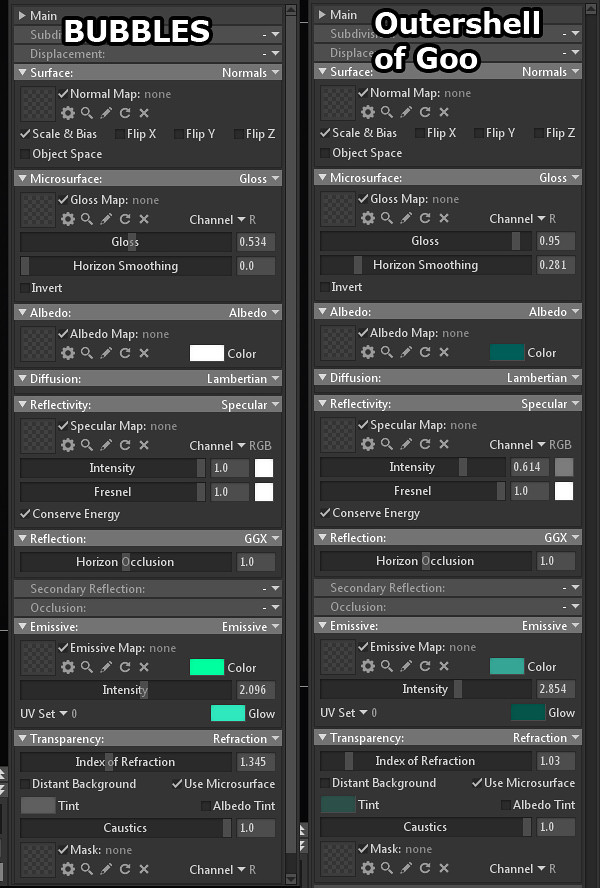
And in the last frame updated green goo was spotted. I made some adjustments to the outer shell and filled it with a lot of bubbles. Actually, the first idea was to make it via texture, and then animate the offset of it, so there will be an illusion of flow.
But this approach ended up looking 'meh' at it's best. Also at this time I decided to go full time freeze, with nothing animated except the camera.
The whole trick with green goo is in translucency and actually emitting light. You can see material settings below.
After this moment work started to change into it's own character and reinvent itself on it's own.
Since this build of the scene heavily relied on a reflected light, making albedo of the objects darker would gradually change whole lighting scheme. Who could have guessed, ha. As I moved further with the texturing, picture became darker and darker, which wasn't expected.
After another session of refreshing my mind to perceive the whole work in a right way, I actually liked how it turned out, because it came exactly along guidelines of the story - dark and stuffy timeless place. Where the hell is light in this story? Well, except from the outside, of course.
Anyway, that's the moral: don't use gray materials even at the blocking stage, try to put at least colors, which you intend to put in a final version or something similar. It's not 1997 anymore, and we can afford to see some other materials in viewport, not only gray default. Don't be too stiff with your initial plans if better solution is appearing.
Cloth in 3D Coat
Another part of story is about amazing 3D Coat. It amazed me this time AGAIN: it has been surprisingly descent for cloth simulation.
Quite frankly, it's very bizarre, but actually kinda make sense: to use cloth tool in 3D Coat you have to load mesh from a retopo tool. Of course, you don't want to simulate millions polygons, so you better to make their count as low as possible. Fortunately, inbuilt AUTORETOPO function does this job just majestically.
So that's what I did: added standard human figure; duplicated layer with it and sculpted very rough shape of hoodie. After that it was automatically autoretopped and put into Retopo room, where I deleted pieces from face, hands and bottom area, making holes in cloth.
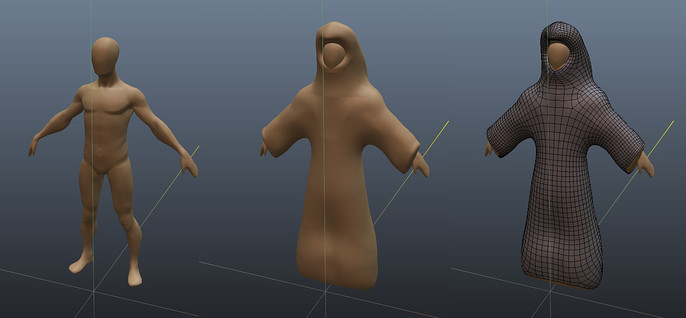
And now it's time for the most interesting part - to press "Start sim" button. It's very ascetic and have only three variables: Gravity, Friction and Thickness of the cloth. More than that: you can grab and drag cloth, and it will be recalculated in a real time.
Important thing here is resolution. Obviously, less polygons you have, less time and calculating power it requires for a simulation. But what to do if you simulated overall shape, and wants to make little folds now?
3D Coat's Cloth Tool has a trick in it's sleeve: simple subdivision so you can resume simulation with a lot more polys than it's started with.
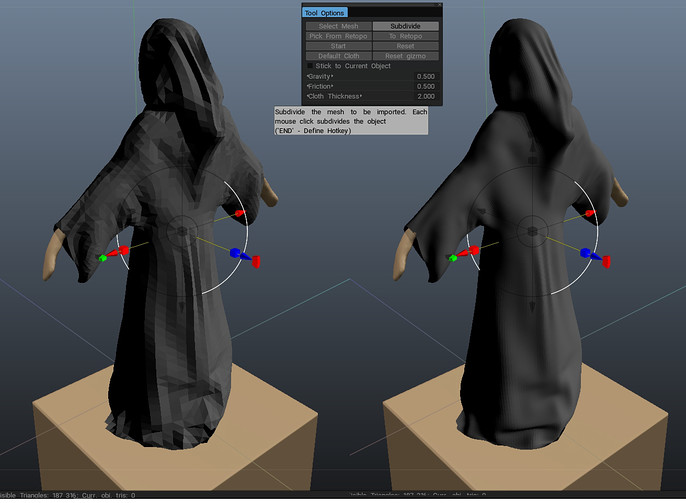
And that's pretty much it. After that you can export your cloth back to retopo room, where you can unwrap it and export to an external package.
Camera Animation
And last, but not least part of whole work is presentation. Usually it's all about post-processing but since rules of the contest do not forbid but are required to minimize use of post processing, there is not much to tell about. Maybe only about my fascination of Marmoset. You can do simple post-effects like DOF, vignette and chromatic aberrations not just using only possibilities of render engine, but do it instantly, without adding much time to render because it's literally a real time engine (duh).
Of course with a scene that big, GI turned on an indoors scene, relying on a indirect lighting.
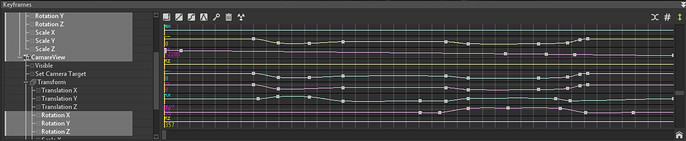
So, main thing with that last stage of work was animation of the camera, which is supposed to showcase the whole world in a best way possible. There isn't too much trickery involved, just a standard trick with a camera, parented to a empty group with a pivot point at a 0,0,0 coordinates.
With that setup I was able to control rotation of the whole rig just by one attribute (rotationY), and distance from the center by uniformly scaling. Some flexibility was necessary with the moments, when the camera rotated on it's own and with this kind of setup it was possible. Keep in mind that contour light was parented to a camera so it lit objects from the behind in a same fashion from any angle.
Animation itself was done in Toolbag 3 entirely. Thankfully nowadays it's as easy and intuitive as in every descent animation package.
Closing Thoughts
Making a closing remarks I could say that it was a pretty interesting experience, not without some problems and troubles, but what is the point of living without them, eh?
1. Back light is good, you should use it.
2. Don't use solid gray material, even for blocking. We are no longer in 1997, your workstation can handle that.
3. Learn fundamentals especially if you are a 3D artist without knowledge of design principles, composition and that classical stuff. That's where it all springs from and what matters in the end. I definitely should do a few sketches next time before even blocking, because it's quicker and surprisingly less specific, so you have a wiggle room in interpretation. Not to mention bad choices and redoes, which easy could be avoided with a solid sketch and strong knowledge of fundamentals.
4. Arrange your priorities. As Frederick the Great once said: 'He who defends everything, defends nothing'. It's better to have a little, but pretty illustration, than an incoherent monstrosity.
5. Stephen DeStaeble said: 'Artists don't get down to work until the pain of working is exceeded by the pain of not working.'. Don't be afraid of that, but acknowledge and don't let it control your life and thought process. Let yourself express your thoughts and feelings. Don't be another mind-numbed craftsman. Have courage to let your inner artist to aspire.

You can check the thread on a forum and find even more steps and renders mentioned in this article.
Thanks to the Cubebrush team for great contest and opportunity to express my thoughts and feelings via this article.
Take care and see ya soon!