How to Create a Video Game Character
Sergio Hualde is a freelance character artist and instructor for video games and collectible statues. He began in the 3D industry four years ago and has since learned and worked in advertising, architecture, collectibles and mobile video games. Enjoy the making of 'Fallen Angel'.
The Fallen Angel idea started when I read the rules of challenge. I wanted to create something that represented the transition of light to darkness. So, I started creating the transformation of a bad Angel. An angel as the enemy. The Angel that would be your worst nightmare. The Fallen Angel.
HOW TO CREATE A VIDEO GAME CHARACTER

Step 1
I began by using a sphere, z-spheres or base meshes. I usually create all my models from spheres because it allows me to practice the proportions and the anatomy. I create everything with dynamesh and when I have all the objects blocked I use Zremehser to create better topology and subdivision levels.
Step 2
I turn off the symmetry and try to get the anatomy I want. I have to use many anatomy references and choose what shapes I want to be in the model.
Step 3
This part is divided on two phases.
1. Create tertiary details and/or shapes of the body.
2. Create the details. I download skin detail alphas or create alphas with standard alphas of zbrush and use it to create the final details (like pores or wrinkles).
Step 4
In most cases, I start blocking the accessories in the first step, but in other cases I have preferred to make it after to finish the body. Now, I must create every cloth, tools or anatomy that the character wears.


Step 5
When I need to import high poly models on other programs like 3Ds Max, Maya or Blender, it is better my model has less polygons. To get this, we have decimate tool. It’s awesome. The model lost a lot of polygons but the important shapes will be alike.
Step 6
Move the model to other program. To do this I have to export the .obj (or .fbx) (deactivate groups button) and import at the new program.
Step 7
The retopology tool is very easy to use but I have to think of how I create our model shapes and loops. These loops will help in the future when I will want to rig and animate my model.
With bad topology it is impossible to create good animations and rigs.
Step 8
When I finish creating the retopology, I have to cut mesh and unfold it to create good UVs coordinates. This UVs allow us to create good or bad textures, but it depends on the polygons tensions on each part.

Step 9
Baking maps is easy if my last steps were done correctly. If you want to create good bake textures you have to bake every model that you have separately. To do this, you have to use the “match – by name” tool in the baking window. It is a very useful tool to create perfect bakings.
Step 10
The basic textures that we have to bake are normal, ambient occlusion and curvature. If creating I would recommend that you create all maps. ID map is very useful to paint the texture after the baking. It uses zbrush polypaint to create ID map with the vertex paint.

Step 11
I always start creating basic color with fill layers. They are the best way to paint the model because it gives me the control of the parameters on any moment.
Step 12
The generators are the key to create very small details or shadows in some areas automatically. I use smart mask.
Step 13
I am used to first creating base color and when I have finished I create roughness and metallic materials.
Note: If it is organic material, metal or wood for example, I use everything at the same time.
Step 14
This step is easy- I recommend you create a custom profile. When you have it, you only have to click on your profile and click on export textures.

Step 15
I am able to pose the model in a lot of ways. One option is to create a rig. In my opinion the best way is to use the Zbrush mask and transpose/gizmo. It is simple and gives me full control of my model. I recommend creating a lot of polygroups to use quick masks. Before I start to pose the model, I have to click on TPoseMesh to combine all the sub-tools in one.
Step 16
When I finish the pose, I click on TPose SubT to separate every subtool. Don’t save the file when you are on the last step. If you save with one subtool, you won’t be able to separate and you will lose the UVs.

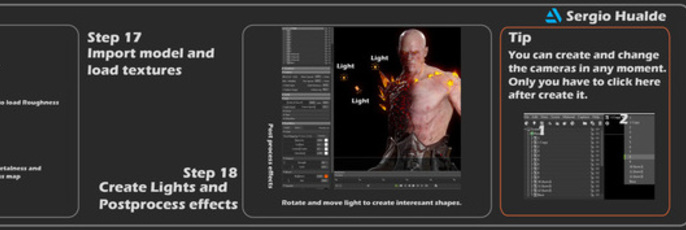
Step 17
In the render programs (like unreal engine or marmoset) I create a material. I load the texture map on these materials and try to get the best result I can.
Step 18
The last step is to create the illumination and post process effects. These two steps are very important as it can create a model with awesome presentation or with a bad presentation.
I hope that this tutorial helps you. See you soon and remember, learn, work and enjoy.
