
The Artist Behind XMD
XMD is a Cubebrush store boasting the largest Zbrush brush Collection in existence. We wanted to get to know the artist behind this top selling store and Michael Dunnam generously agreed to answer some of our burning questions.
Q. Tell us about yourself. When did you decide to become an artist? Can you show us some of your earlier works?
My name is Michael Dunnam. I grew up in Mobile, Alabama. I always knew I wanted to be in the gaming or film industry. My parents always encouraged my artistic side. When I first began college, I was actually a CIS major. I had no idea that animation schools even existed. It wasn't until I was writing a paper on "What I really want to be", that I found out about schools like SCAD and The Art Institute. That was pretty much all it took. The next semester, I packed my bags and moved to Atlanta. In school for the first 3 years, I focused mainly on VFX. It took me a while to finally realize I did not like waiting for particles to render. I wanted instant gratification! It wasn't until my professor, Paul Orlando, introduced me to UnrealEd. Man was I in love. I immediately changed my focus to gaming. Long story short and a ton of hard work, I graduated in 2005 with a BFA in Computer Animation.
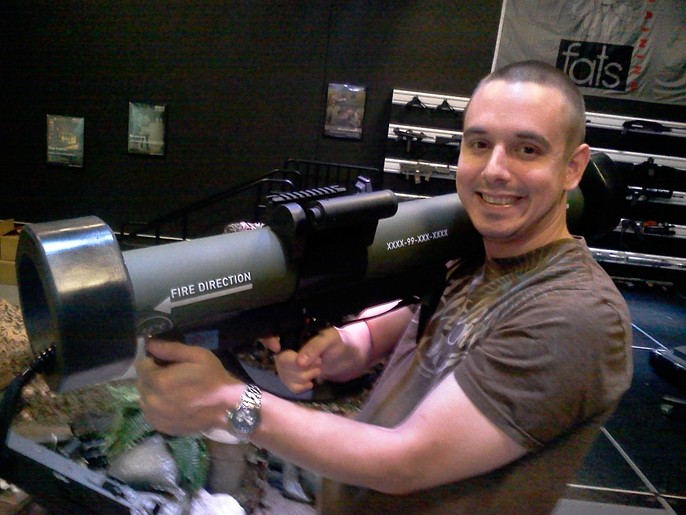
Almost immediately after graduation I, along with several classmates from school, found a job at a local MMO company. We worked long long long hours for barely any pay. Which I am sure many of you out there can attest to. We worked and reworked the same games. Actually, we were working on 3 games at the same time. Another long story short, they went out of business and I found myself looking for another job. What came next was a total surprise. I found a job at a simulation company. Some might think that it is not a very glamourous job, but it actually is a really cool job. Meggitt is a world leader in military simulation. We basically make video games with real guns. See?
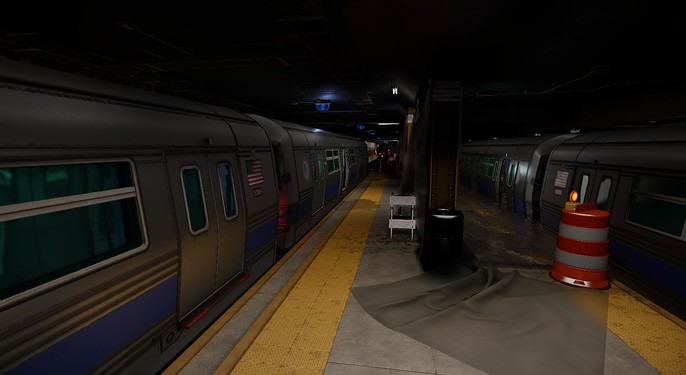
This is the oldest piece I still have from 2010, where I modeled my desk at work.

More of my portfolio can be found here.
Q. What made you decide to sell custom brushes? Can you show us some examples?
I started using ZBrush back in 2005. Almost every tutorial that existed was focused on characters at that time. There still aren't many environment based tutorials out there now. I spent a lot of time converting photos to alphas and hand painting alphas in Photoshop. Eventually I had quite a collection of brushes I had created over the years. I decided to throw them up on my website and ZBrush Central in 2012 for free. Not too many artists shared brushes back then. But apparently there was a market for it because I had over 10,000 downloads in a week. I continued to make brushes for a while to give to the community for free because I enjoyed doing it. After a while, the number of downloads took a toll on my web hosting, so I decided to try and sell a few here and there. There really wasn't a cost-effective way of doing it at that time, so I just accepted donations on my site.

This is one of the first sets I ever created. These were hand painted in Photoshop over a photo. A process I still use sometimes today. Although I have a much better technique now.
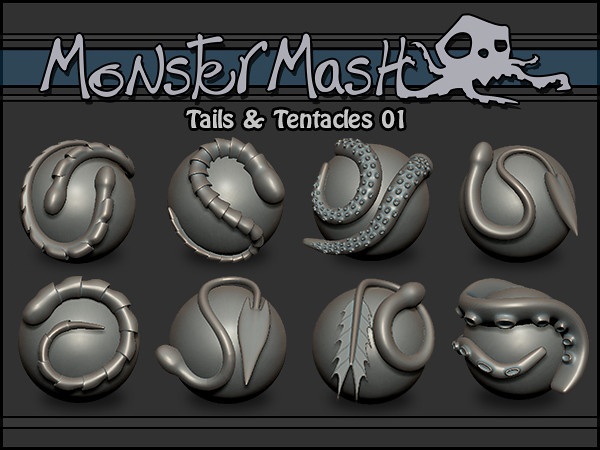
Here are a few popular sets:
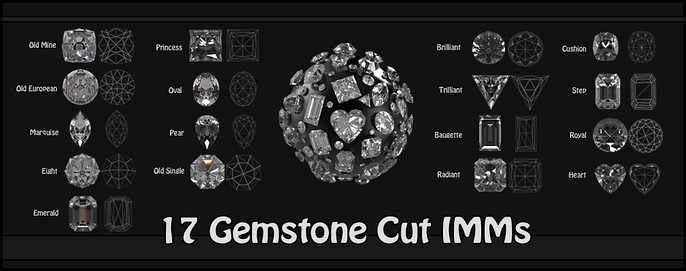
There are several sets that belong to the Monster Mash brush library. These brushes were intended to be kitbashing brushes for quick monster sculpts.
This medieval brush set was my first attempt a nano brushes. These contain Nano, Insert, and a few IMM curve brushes.

Q. After joining Cubebrush, how did you begin to market your store?
I will be perfectly honest with you, the system at Cubebrush works so well, I do not really have to market anything.
With other storefronts, everyone has to market everything themselves. You also need to learn quite a lot about marketing to be effective. But with Cubebrush, the system is nearly perfect. There are only a few things I would add (email *cough*). One thing stays true to everyone starting out. Everyone likes free stuff. Remember that.
I also rely a lot on word of mouth. Schools are fantastic for spreading the word, so I have been working on getting XMD more visible to colleges.
Q. Can you take us through the thought process of creating the XMD Toolbox?
The ToolBox was a LONG process. It actually began as an idea on a napkin. Yes seriously, a napkin. How cliché, I know. But what great idea doesn't start on a napkin? 😉 Last year, I was having a delicious sushi lunch with my good friend, Edric Rominger. Who also is the very talented programmer behind XMD. I have to give a ton of credit to him, because without him, The ToolBox would not exist.
While we were having lunch, I brought up the idea of a way to make the 800+ brushes I had already released easily accessible to everyone that uses them. There really wasn't a great way to browse them or even know what exists. The lightbox in ZBrush is clunky and a little glitchy. Browsing the icons I include with brushes just wasn't enough. So, we tossed back and forth a few ideas and came up with a basic concept of the ToolBox. We worked quickly to get to a closed beta. Beta was available to anyone with an XMD Membership. We kept a features list that kept growing and growing. I took polls and suggestions from the XMD Members in the Facebook group as well. I am proud to say that we implemented 95% of the suggestions and requests from members.
We have a great XMD community. A huge portion of the ToolBox became what it is now because of the XMD Community. They play a huge part in everything I do with XMD. During beta, we met every week to go over our next phase. We also tried our best to come out with a new version with significant updates every week and were very close to that. I have a TON of people to thank for what the ToolBox and XMD became, including close friends who lent their personal experiences and ideas. And my wife and kids, who are my greatest source of inspiration and motivation. We are definitely not done yet! There is so much more to come.
Q. Can you explain in detail how it works?
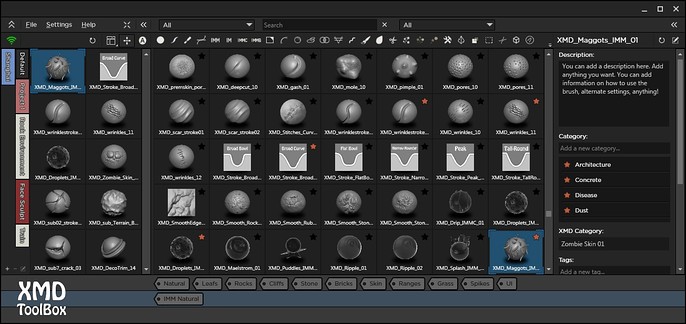
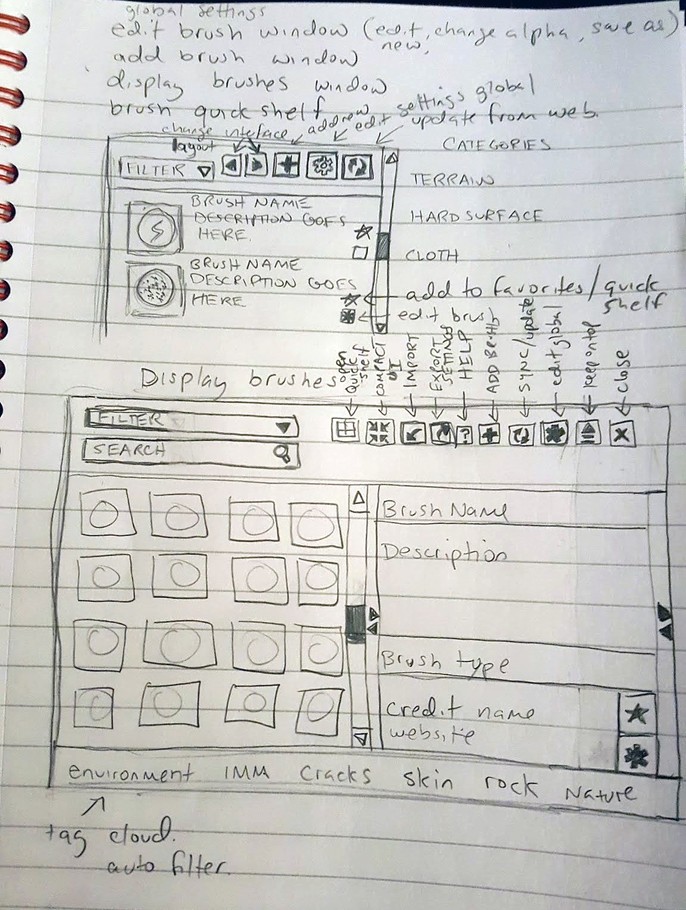
Using the ToolBox is very easy. We tried to make installation as simple as possible. All you really need is your license key and you are ready. You can load any brush or alpha into the ToolBox. Once you have loaded your brushes and alphas, they are displayed in the library. Every XMD brush is already setup and ready to use in the ToolBox, once you add the location of them in the settings menu. There is a dropdown included that displays every XMD Brush set that you have. The best feature of the ToolBox is the organization, with several ways to organize your brushes and alphas. I will go over the main features of the ToolBox.
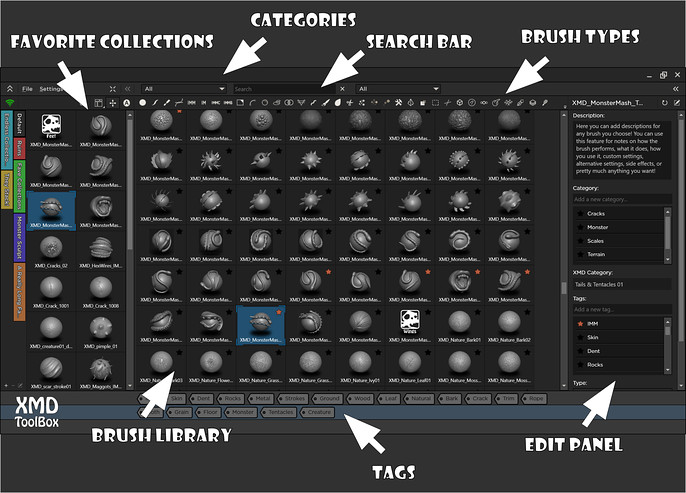
Descriptions
Every brush and alpha can have a description. You can think of the description as a way to tell yourself a little info about a brush. Let's say you found that a particular crack brush works great as a scar if you inverted it and added some blur. Or perhaps the weld brush works great as a vein brush if you turn down the lazystep, increased the lazysmooth and put more a radial falloff to the edges. Hint hint. This is pretty much your space to keep notes for any brush. It is your equivalent to having a customizable ctrl-hover option for the ToolBox. Actually, that is exactly what it is.
Categories
Categories are another great way to sift through and organize your brushes and alphas. You can click on any brush or alpha and in the edit menu on the right, add a category or select an existing one. When you add a brush to a category it will show up in the dropdown. When you click on a category in the dropdown, it will filter the library to only show that category. These would probably be the more permanent organizational ways in the ToolBox. However, you can delete them and rename them.
XMD Categories
All XMD Brushes come pre-categorized by release set. The list will only show sets that you have at least 1 brush from that set.
Tags
You can look at tags as a quick filter. You can select multiple tags, they are always visible in full mode. This would be a great way of just setting a few brushes as for instance, "rock" brushes, and some brushes as "skin", etc.
Favorites
Favorites are probably the greatest feature of the ToolBox. Every brush and alpha can be faved by clicking the star icon on the brush in the library. Once you click that it will be added to the default favorite window on the left. The favorites also have sets. When you add a new set, it creates a tab. Whichever fave set is active, the brush that is favorited will go into the active fave set.
Fave sets are fantastic for knowing what brushes work great together for a particular job. You can have as many sets as you want and you can quickly switch between them by clicking the tab for the set. You could also use fave sets to know what brushes you used for a project or sculpt.
Display Modes
The different display modes of the ToolBox can totally change the way you sculpt and your efficiency. If you use multiple monitors you can run fullscreen on one with the entire ToolBox wide open. You can collapse the library down to only show the favorite window. You can collapse the edit pane to give more room to the library pane. And there is also mini mode. From our analytics, this seems to be the most common way to work for people with small resolutions and that was exactly how it was intended. In mini mode, you just get one column of favorites with the tabs. So this is a great way to work if you have your faves already set.
Brush Type
The brush type toggle is actually one of my favorite features. It took a while to figure out icons for all of these as well lol. People have actually thanked us for creating the brush type toggle. The reason we created this was because ZBrush does not tell you every brush that exists. There are several brushes that are hidden away. I bet 75% of people close lightbox and never think twice about it. But there are actually several brushes in there that aren't in your normal brush library in ZBrush. So if you click through all of the brush type toggles you will find these hidden gems. I went through every single brush from my sets and Pixologic's, and came up with a type for each. Some I felt needed a different way of typecasting them than Pixologic did. For instance, the mallet brushes. These are actually polish and clay brushes, but I created a mallet brush type for them because they are awesome brushes and need to be in the appropriate type.
Multiple Installs
By our EULA, you get 3 installs. We actually encourage people to use it at work, at home, at school etc. This gives us more exposure. The more people that use it in a public setting, the more people see it.
Themes
The ToolBox comes preloaded with several color themes. These were a huge request from members.

Q. Did you run into any hurdles during the process? How did you resolve them?
With any production setting you are going to run into hurdles. Our biggest hurdle is time of course. There are only two of us working on this and we spend most of our free time. Having a fulltime job and a family, there is definitely a balancing act. I am sure anyone that has tried to do a massive project with those 3 knows it can be rough.
Another hurdle we ran into was finding the best way to deliver the content of XMD. We are live on Cubebrush and Gumroad.
I must say, that even though it is younger, Cubebrush has quickly become my favorite.
There are still a few features that I am waiting for Cubebrush to add, but it's about as perfect as you can get for a storefront that the user doesn't host themselves.
And finally, new brush content is always a hurdle. I take many requests and have polls in the Facebook group, which definitely helps. But finding that next brush set can be a challenge.
Q. You recently released the XMD Lifetime Membership at your Cubebrush store. How does that work?
The XMD Life-Time Membership is THE Ultimate Membership. It truly is. Marc was joking with me one day and said, "I just call that a product". But it is way more than that. It really is. With the Membership, you get everything I put on Cubebrush. You get support. Yes, I answer emails and private messages. Beware though; sometimes I tend to get chatty.
You get access to the private Facebook group. The Facebook group is a great community of artists. Several friendships made and even industry contacts. We throw around ideas for features for the toolbox, new brush ideas, people share their portfolios or just chat it up. You also get, currently, 21 sets of member only brushes. These have never been and will never be released to non-members. There are 100s of brushes within these sets. You get the XMD ToolBox. You truly get to be a member of the XMD Family.
There are 3 types of releases; Subscription, premium and free. Subscription are the members only brushes, premium have a cost associated with them and free are of course free to anyone. All of them are included in the membership.
You also get a video tutorial on brush making techniques and a few quick PDF tutorials.
Q. Which brushes have you found to be particularly popular? Why do you think that is?
The IMM Hair brushes are definitely by far the most popular. Skin and Crack brushes are close behind. I believe the hair brushes are popular because they are so simple to use. You can easily layer them and dynamesh to get great results. The skin and crack brushes are popular simply because of the amount of organic and character sculptors. Crack brushes can be used for environment as well as character sculpts.
Q. From Lifetime memberships to the release of the XMD Toolbox you have been really busy. What is the next product we can expect from XMD?
By the end of the year we plan to make a Mac version of the ToolBox. We also have a very exciting feature coming soon to the ToolBox that will allow members to download new brushes straight from the ToolBox. And of course, I will continue to release monthly brushes. This has been my promise from day 1 and I have mostly kept that promise. I think I may have missed a few by a week or so during the beta of the ToolBox. But I always try and make up for it. 😊

I am also looking for the next collaboration artist. I have made a few sets with other artists. So far I have made collaboration sets with Jonathan Nascone, Garry Lewis, Johnny Renquist and Alan Carter. These collaboration sets always turn out awesome.
Lastly, we are very excited to be able to show you, in the next few weeks, what we have been working on. I can promise that you will not be disappointed. If you have not snagged a Life-Time Membership, now is the time!
Follow Michael here: