360° Painting
Panoramic (360°) paintings have been steadily growing in popularity since Facebook started to support the 360 degree format and it's no wonder - they're a completely new window into a painting or a photo.
In this tutorial I will cover the various steps required to get started pano-painting in Photoshop.
1. The very first thing we need to do to get started is create a new canvas with a ratio of 2:1, meaning it should be twice as wide as it is tall. You'll want to make the file size as big as you possibly can since you can only see potion of the panoramic painting at any given time (more or less depending on your focal length).
In this case we're going with a 10000px x 5000px canvas.

2. Now let's turn this flat canvas into a 3D sphere that we can paint on!

You will likely be prompted to switch to the 3D UI - accept. Once everything is done, you might want to add a few panels to customize your 3D view since it changes quite a lot of things.
I like to add back the history and color panels.
And now you're all set to start painting in 360!

3. At this point you might have noticed a couple new things you've likely never seen before. There is a new 3D tab and there and some new layers that showed up.
There's also the Properties panel but while this might all seem like a lot to take in, there's only a few things we need to worry about.
In the 3D tab, the "Current View" is the first one we'll take a look at. This is the layer you want selected at all times when you're painting since that is how you rotate the camera around. You can also move the mesh itself by selecting the "Spherical_Panorama" instead but this will mess your rotation axis so I wouldn't recommend it unless you want to have a really hard time moving the camera around.
If you click on that camera layer and look at the Properties panel, you will see that you can change the POV which is quite handy. I like to have it set at around 10.

Finally, the last important bit is about layers. In the layers tab, you will only be able to move the camera if you have the bottom layer selected. You can create as many new layers as you want but you won't be able to rotate when those are active.
Note: to rotate the camera, make sure you are using the 3D UI, that you have the Camera View layer selected and press "V" on your keyboard to enter the navigation mode.
4. Now that we have the basics down, it's a good idea to load up a perspective grid in our project to help our perception of space.
I've created a great one that you can grab for free here:
https://cubebrush.co/mb/produc...

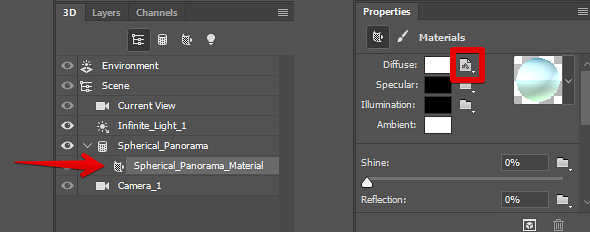
In the current window, what we see if the result of the projected canvas onto a 3D sphere. To add the grid, we'll have to edit the base texture itself. To open it, select the "Spherical_Panorama_Material" and in the properties, click on the little icon next to the Diffuse, then select "Edit Texture".
The texture file that will open is what we initially projected onto the 3D sphere. The 360 window is the parent in their relationship, so any change that you make in either of the windows, the same change will also happen in the other. All we have to do now is load up that grid, and paste it on the top layer of the texture file. You can also set it to the "Multiply" blend mode so that everything underneath still shows. When you save, the change should propagate to the 360 window.

You can now go back to the 360 window and start painting with the help of a nice grid!
Note: When painting directly onto the Background layer, things might get a little choppy so I recommend you create a new layer temporarily and paint the details on that new layer - You won't get the lag. Next, merge it down using CTRL+E once you are done and ready to paint from a different angle.
Repeat this process until you're done! There you go, you now know how to create panoramic paintings in Photoshop.
For extra details and tips, check the video below explaining the process.
Download the free tutorial and grid here:
https://cubebrush.co/mb/produc... https://cubebrush.co/mb/produc...
-Marc