Mind Mapping Tribal Shrine
Reide Perigo uses mind mapping and design sketching to develop his Tribal Shrine environment idea.
He takes us from idea to polish in this great tutorial that leads to his finished Worlds Challenge entry- Tribal Shrine.
Stage 1 | Design Thinking
DESIGN BOARD

As with any design challenge, I first begin with a design board. This could be done on a scrap piece of paper or using digital media. In this instance, I used Photoshop. This initial stage is all about finding unique and entertaining ideas to connect with referenced historical inspiration. In the case of this challenge, the narrative was general: "designing/creating an environment merging the old with the new, choosing either Fantasy or Sci-fi as your dominant genre," so I also needed to come up with additional narrative.
As the first step, I setup my design prompt, guidelines to define the scope of the design. Once the design prompt is set, it is time to start generating ideas. For this challenge, during the process of establishing the design prompt, I had the idea of using a primitive civilization (more specifically African tribal) built around the remnants of the old world (the advanced world).
I am ready to mind-map (jotting down keywords to generate ideas and find connections to design around), and have a few great keywords to get me started. From just three words, Africa, Rebirth, and Disaster, I am able to generate a network of ideas that in my mind construct the world. By mind mapping I am able to come up with the design idea for the project. Some of the ideas may not be used but they setup a great base to build my design on. Throughout the mind mapping process I help to create the world in my mind by adding a few reference photos. The images are used to either represent the feeling I want to convey or a generalized reference to the culture I wish to depict.
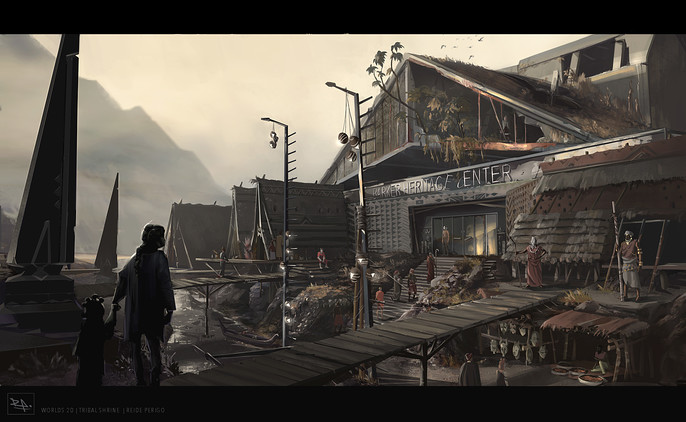
For my project, I designed a world in a future in which natural disasters have reshaped the Earth. With the fall of advanced civilization, the world would fall back to a primitive state. Remnants of the old world would become holy places that were pilgrimaged to. The focus of the project would be on such a remnant, on a heritage center. This center/library contains knowledge of the old world that helps shape the new world outside the center. This is where I was able to infuse the referenced African tribal cultures. Around this remnant structure, new primitive constructs would be built having been influenced by the knowledge found within the heritage center and even in its shape design.
Stage 2 | Design Sketching
With the design prompt and narrative set, I will need images to reference for the design sketching process. For me, compiling references is an organic process. I start with a folder full of them to activate the creative mind and to study the culture. Later in the process I will gather more specific references to each design.
e.g. African thatch buildings for the vendor stalls.
INITIAL COMPS
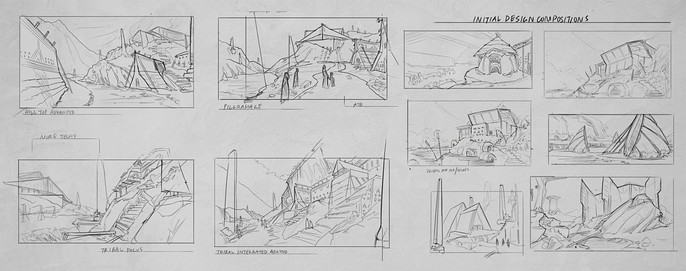
I begin designing loosely, caring little how technical the sketches are. The focus is on the shape language and composition of the piece. As an environment scene, these initial sketches where line-work compositions. Focus was on stretching the imagination so that the design is entertaining, yet also infusing the referenced African culture to ensure the image is relatable.
DESIGN SKETCHES
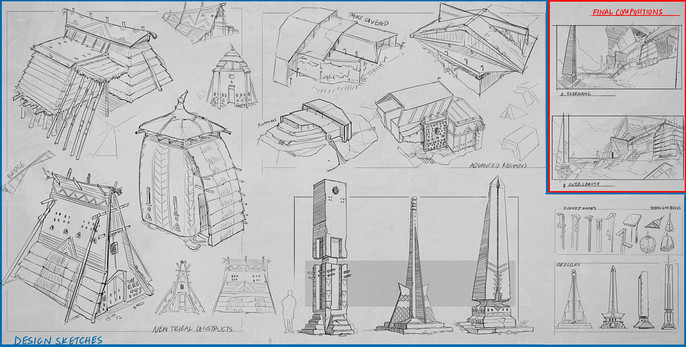
After a round of compositions, I begin design sketching the individual parts that make up the scene. These parts include the focal point (the remnant building), the primitive constructs, and other props such as light poles and pilgrimage markers (the obelisks). I next generate another round of compositions, this time using the designs I had just created.
3D BLOCK-IN
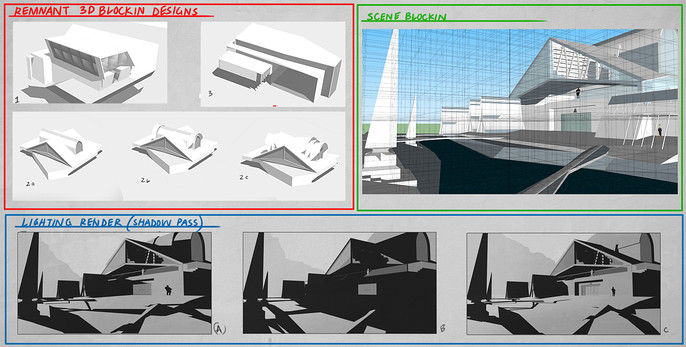
Next I take the developed designs to 3D. I most often use SketchUp or ZBrush, and in this case went with SketchUp due to the angular nature of the designs. After modeling a few simple remnant buildings, setting up a camera, and mocking up my compositions, I am able to quickly test the different pieces in the scene. After deciding on the more triangular shape language and locking down the camera, I add a perspective grid overtop the model. The rest of the image I designed by drawing over the block-in or later in the paint-over stage. Using the basic lighting/shadow system Sketchup provides, I tested a few lighting options. I decided on a dusk or dawn time as it provided a dynamic shadow shaping and I knew it would also provide a nice color scheme.
DRAW-OVER
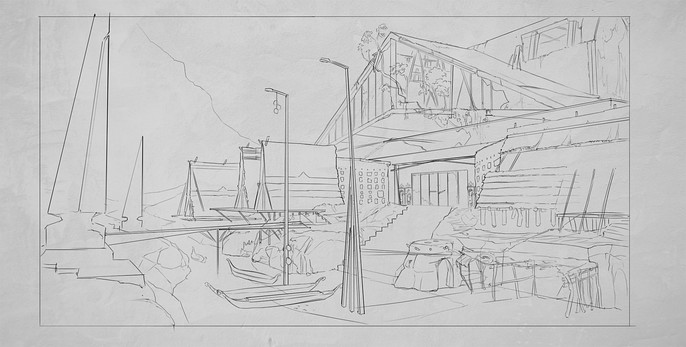
With the design-phase all but complete, I draw over my 3D block-in to complete the line work of the scene. At this stage I already know all the elements I want to have for the image; the remnant building which is corroding, falling apart, and overgrown with plant life, the tribal elements, and cliff drop off where the parking lot or surrounding area sunk in and required bridges.
Stage 3 | Render
VALUE & COLOR CONTROL
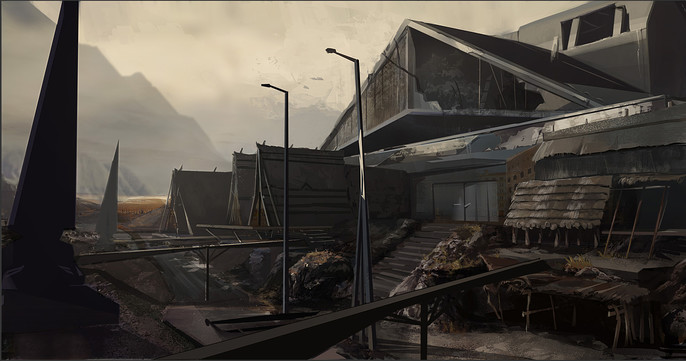
My first step of the rendering process has always been to come up with an appealing color scheme and to develop the value levels to work in conjunction with the perspective in creating depth. Referencing a number of photos taken at golden hour I decided (and often do) to go with a desaturated color palette focusing on browns and the primary colors. To create value separation between the foreground, mid-ground, and background, I lasso paint the gradients in. The simplest scheme to ensure depth in a painting is for the foreground to have the darkest values, the mid-ground the medium values, and the background to have the lightest values.
Now that the value gradient and color palette are decided, I like to turn down my analytical brain and let my creative subconscious work the painting. This phase is where I experiment with texture brushes, working on contrasts, adjusting the flow of the piece, working in cast shadows, AO, reflections, specular highlights, and bring out different materials.
FINAL ADD-IN AND POLISH
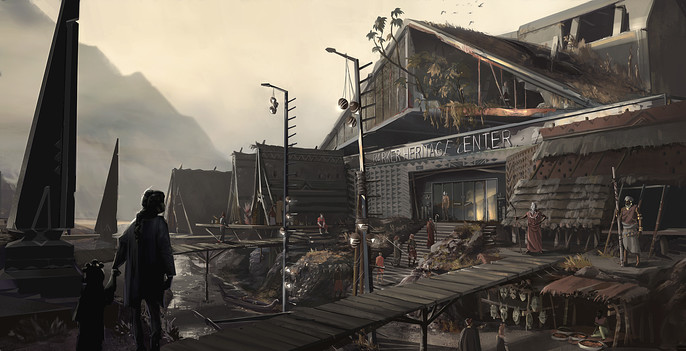
This final stage is the perhaps the longest part of the rendering phase. The big picture is there, now it is just about chipping away at the painting, strokes at a time. I take a step back from the painting and evaluate. Have I met all of the conditions of my design prompt? From a technical standpoint, is everything working; the perspective, scale, shape variety, material variety? What needs to be added? What needs to be toned down? Answering all these questions I make a list of everything that needs to be changed or added to the piece, and what I want to add. After marking off everything from the list, adding more to it, then checking those additions off as well, I am content and ready for a final polish. Still in Photoshop, I experiment with levels, color balance, and perform a series of test layers to enhance the image until I am satisfied.