The Making of a Sci-Fi Corridor: UE4 Scene Breakdown
In this article, 3D Environment Artist, Aditya Rajani details a Sci-Fi Corridor Environment he created for an art test using Maya, Substance Painter and Unreal Engine. Aditya walks us through his pipeline and shared some very cool tips and tricks in creating mood and atmosphere with the help of exaggerated colors and audio.
Bio:
Aditya is a highly influential 3D environment artist who has applied his knowledge in 3D Modeling, sculpting, texturing and rendering to highly advanced AAA video game titles on multiple console and VR platforms. He has worked with some of the most critically acclaimed productions including Warner Bros. Games, Ten O' Six Film and virtual reality powerhouse, Survios. He has also applied his expertise in the commercial world with the likes of Vertebrae Inc. - the rapidly emerging Los Angeles startup focusing on augmented reality based product visualizations with clients including Sony, Disney, Forbes, LA Clippers, Lionsgate and Toyota. He has also teamed up with Moriyama Studio, formerly known as Visual Homes, the Utah-based firm specializing in architectural visualization renderings.
Inspiration/References:
This project was created as part of an art test I received from a company based in LA. There was a maximum limit of 2K texture maps with a special emphasis on modularity, reusability and optimization for VR games.
Since there was not a specific concept to work with, I had the creative freedom to choose any scene as long as it was within the realm of Sci-Fi. After spending a few hours on Pinterest and Google, I had decided to go with a concept by Evgeny Keshin.


Modeling:
The modeling phase was pretty straightforward. You can start by creating a basic blockout using simple shapes in Maya. Then import everything into Unreal Engine with a default UE4 character to get a sense of scale. Make sure to set up proper camera angles based on the concept. Looking at the reference images, it was pretty evident which assets were going to be modular and which assets unique.
Once a sense of scale had been established, I began adding more details to the assets, constantly going back and forth between Maya and UE4 to make sure that everything was imported into the engine correctly.

For baking normal details, I used Quixel NDO because it's integration with Photoshop. You can quickly stamp normal details onto the model by using built-in shapes and masks.
Materials/Textures:
Creating materials and textures chalked up most of my time as it's extremely important to distinguish metals from non metals. By establishing proper surface definition with the help of accurate physically based values, your environment will look good under any lighting conditions. Typically, the glossiness/roughness and specular color values defines the characteristics of a material. Gloss is more powerful than the traditional specular mask, as gloss influences not only the brightness of a highlight but also its size and the sharpness of environmental reflections.
There are many resources available online which can be referred to get a general idea of the most commonly used values for a specific surface type. A general rule of thumb is that for metallic surfaces, the range of specular color goes from 155 to 255 (sRGB) while for non-metallic surfaces, the range goes from 40 to 75 (sRGB). Also, the diffuse color for metallic surfaces is typically very dark. For exact values, there's an awesome chart available online that is created by artists from DontNodEntertainment.
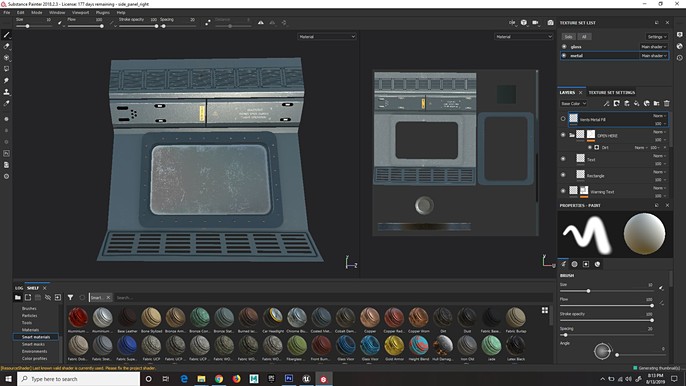
Once I had the base values to plug it into Substance Painter, you can start adding micro-surface details such as dirt, dust, grunge and scratches using smart/custom masks. Typically, the viewport seen in Substance Painter will not match exactly as in Unreal Engine due to difference in lighting. So, it's a good idea to export the textures early from Substance to UE4 and see how they behave under different lighting conditions.


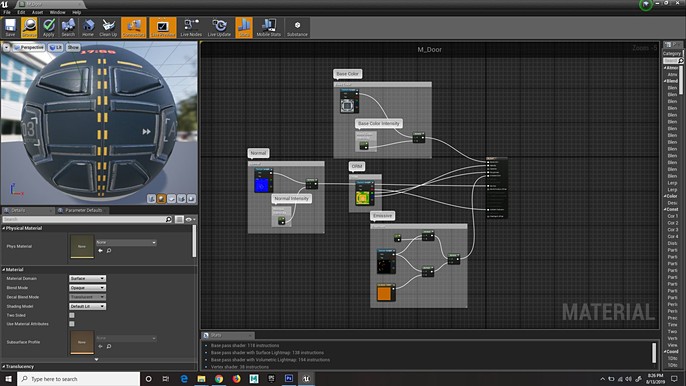
The materials in UE4 were pretty straightforward as well. I created one Master Material for the modular assets and used instances with editable parameters to change them in real-time and apply it to other assets.

Lighting/Rendering:
Lighting is usually the hardest part for artists. A bad light setup will ruin all the good work you've done with modeling and texturing. When lighting a scene, I typically follow one main rule depending on mood. For instance, if you want to make an environment that stands out, you need to make it contrasting with slightly exaggerated colors. It must have a primary and a secondary light setup, point lights as primary and spot lights as secondary.
Players should be able to see what’s going on with the environment from the first glance.
Secondly, do not make the lighting too bright or dark because it can make the players feel confused. A good lighting artist not only needs to use the lighting to guide players, but also improve the atmosphere. Don't be afraid to use particle effects such as Smoke and Dust particles to establish mood and atmosphere. It will give a sense of realism to the scene and make it more dynamic. It's a good idea to start from big and go to small when it comes to lighting. Which means that focus on lighting the objects that the players will see first, then move on to "fill" lights.

Using different visualization modes like Lit Only and Reflection Only will help you to isolate areas that are too "hot" or too "cold" and make adjustments accordingly. Capturing good reflections is equally important as it can really enhance a scene.
To capture the environment reflections on metals and glass, I used a "Sphere Reflection Capture" and set the resolution to 1024. Default resolution under project settings is set to 128 which can lead to blurry reflections. To get crisp and accurate reflections, it is recommended to set it to 512 or 1024 depending on project requirements.


Post-Processing:
Post-processing can dramatically enhance the visual quality of the environment by improving mood and colors. The most important part of post-processing is color grading, also known as LUTs (Look-up Tables).
You can create a LUT in Photoshop by taking a high resolution screenshot in UE4, then adjusting values such as brightness, contrast, exposure, vibrance, saturation etc. and then import it back into UE4 and plug it into Post-Process settings under color grading.
Think of it as a filter that applies throughout the scene and not just to one shot. Using lens effects like Vignette, Bloom and Depth of Field can also be used to achieve a more "cinematic" look.
Audio:
Adding audio to a scene is not necessary but it adds a sense of realism by evoking emotions. A horror film without proper audio will make people "less scared" than with it. For this environment, I wanted to convey a sense of "mystery". My goal was to make viewers think what could be behind that door. Maybe an ongoing experiment on someone? A secret meeting taking place? It could be anything. With the help of proper soundtrack, you can convey a story coupled with heightened sense of emotion.
Final Renders:


Takeaway:
My biggest takeaway from this project is that you need to plan the production of your environment very carefully. If you have two weeks to complete an environment, don't spend a week and a half on modeling and the rest of it on texturing and rendering. Using websites like Trello and PureRef can help you keep track of assets. Set priority on detailed assets that the viewers will first see. Start from "hero" props to more smaller ones and make use of modularity often. This will help you populate the environment quicker and help build your confidence early on in production.